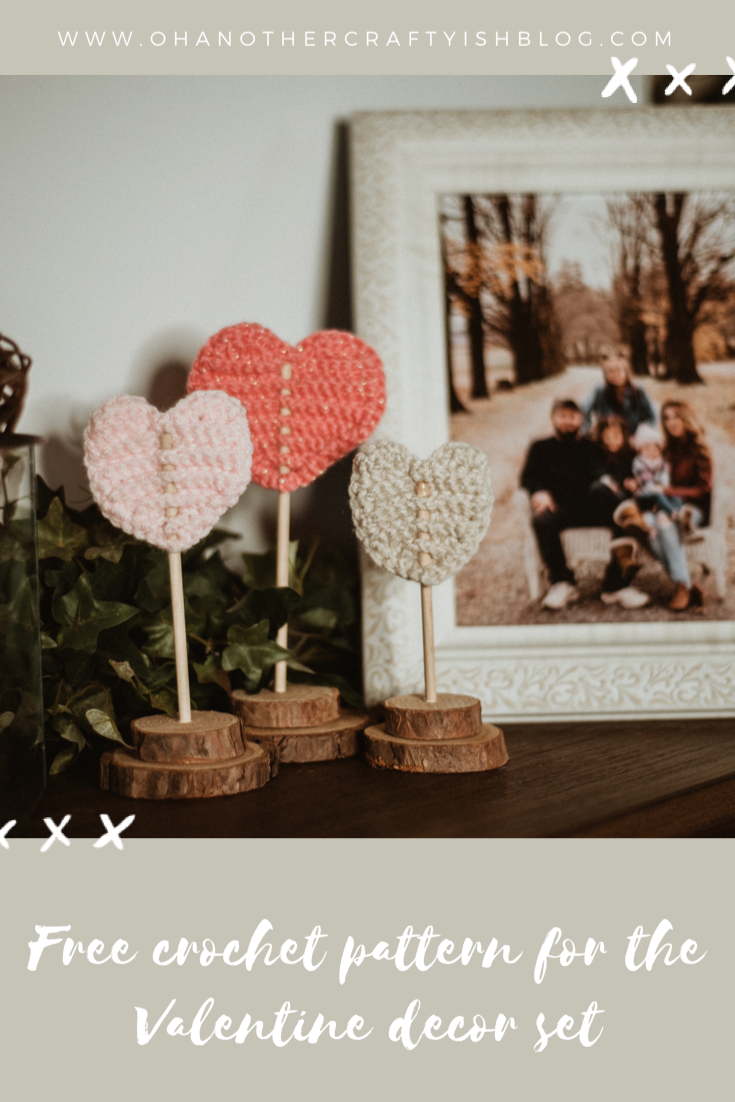
Create your own heartwarming Valentine’s Decor Pattern for your home. Step by step instructions how to create your own.
pin it and save for latter
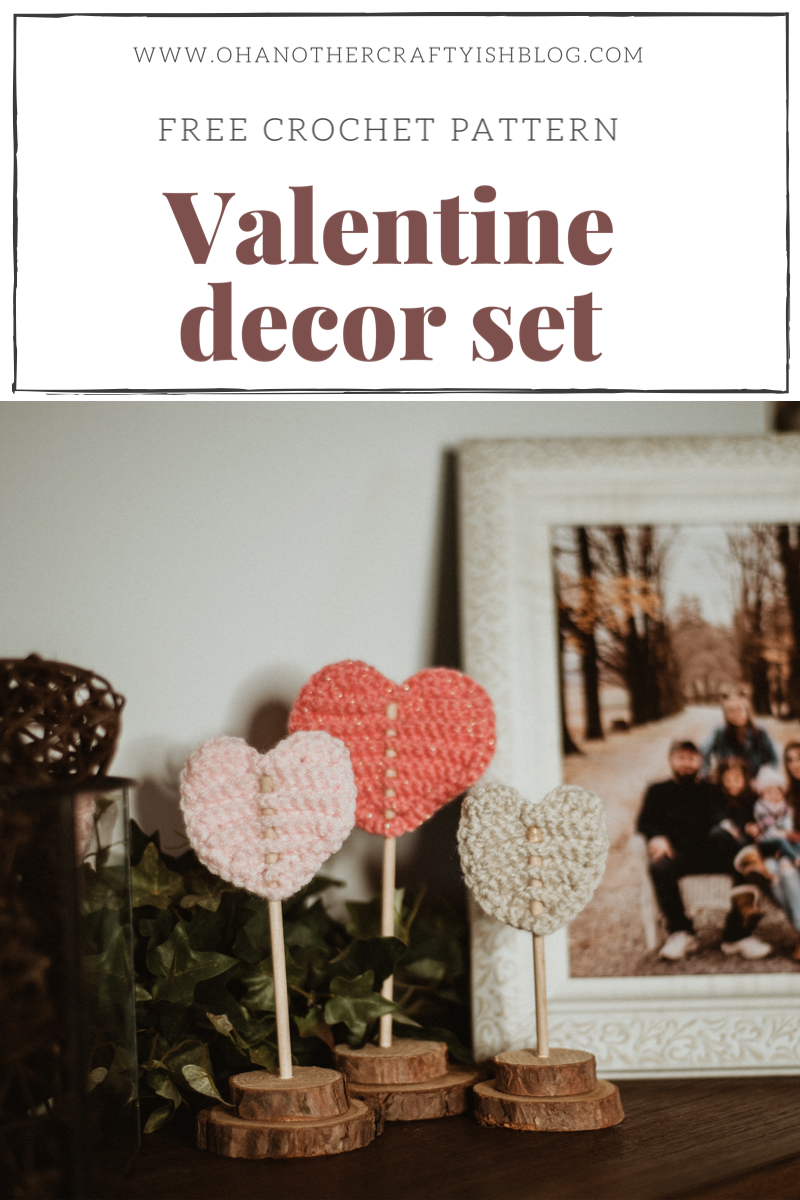
This Valentine’s decor pattern is a perfect little touch to add to your home. It infuses warmth and love during this special season. I loved creating this pattern so much. I poured my creativity and passion into every detail. It radiates not just aesthetic charm but also heartfelt sentiment. This sentiment can be shared and cherished with loved ones.
You can show it on a cozy mantel, or a dining table set for a romantic dinner. It also works well as part of an inviting entryway. This Valentine’s decor pattern can definitely be sure to brighten your space. It will make your home feel all the more inviting for anyone who walks through your door.
Who doesn’t love a good, cute rustic/boho style valentine decor? It’s the perfect way to create a warm and inviting atmosphere that truly celebrates love. When I started my home decor journey, I quickly realized that special little touches.
Handmade decorations or thoughtfully selected colors, make a huge difference in the overall feel of a space. I find inspiration in a lot of things I see when shopping. Whether it’s a beautiful lace table runner or unique handcrafted items that catch my eye.
Recently, I took a little bit of my idea from my Valentine heart party favor pattern. Which I created with care and attention to detail, and kind of mixed them into something different. I’ve crafted a cohesive decor style by mixing various elements like natural textures, soft hues, and playful patterns.
The style not only looks beautiful but also expresses my personal creativity. It shows my affection for this special day. Each decoration tells a little story. It invites friends and family to gather and celebrate together. These moments create lasting memories that we all cherish.
I truly hope you’ve loved this pattern! If you create your own Valentine’s decor pattern. I’d be thrilled if you shared it on my Facebook and Instagram. Don’t forget to like and follow to stay in the loop for exciting new patterns! And remember to use the hashtag #valentinedecorset when you share your lovely creations!
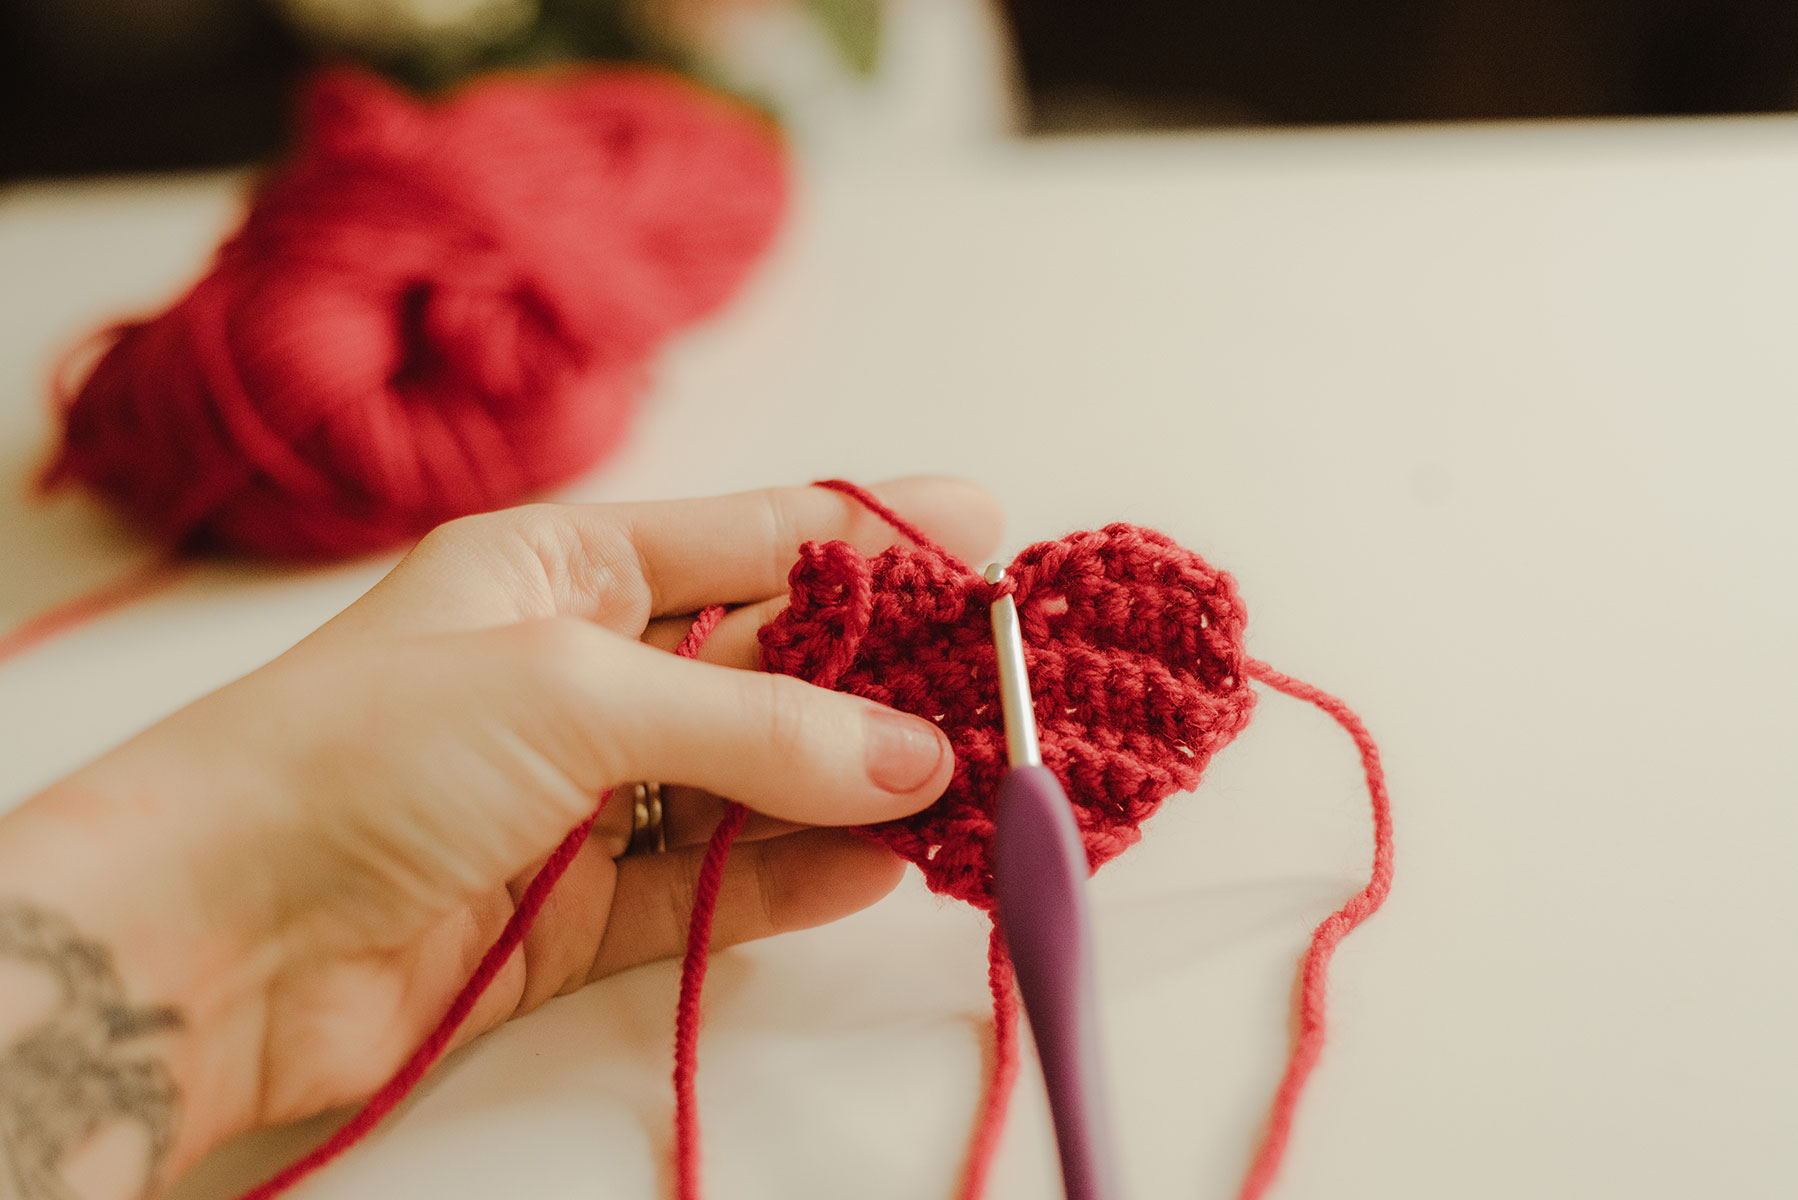
Create your own Valentine’s decor pattern below with step-by-step instructions.
Supplies:
- Hobby lobby I love this yarn (Weight 4/ medium- 355 yds, 7 oz)
- 4.mm (G) Hook (or hook to obtain the gauge)
- Tapestry Needle
- Hot glue gun
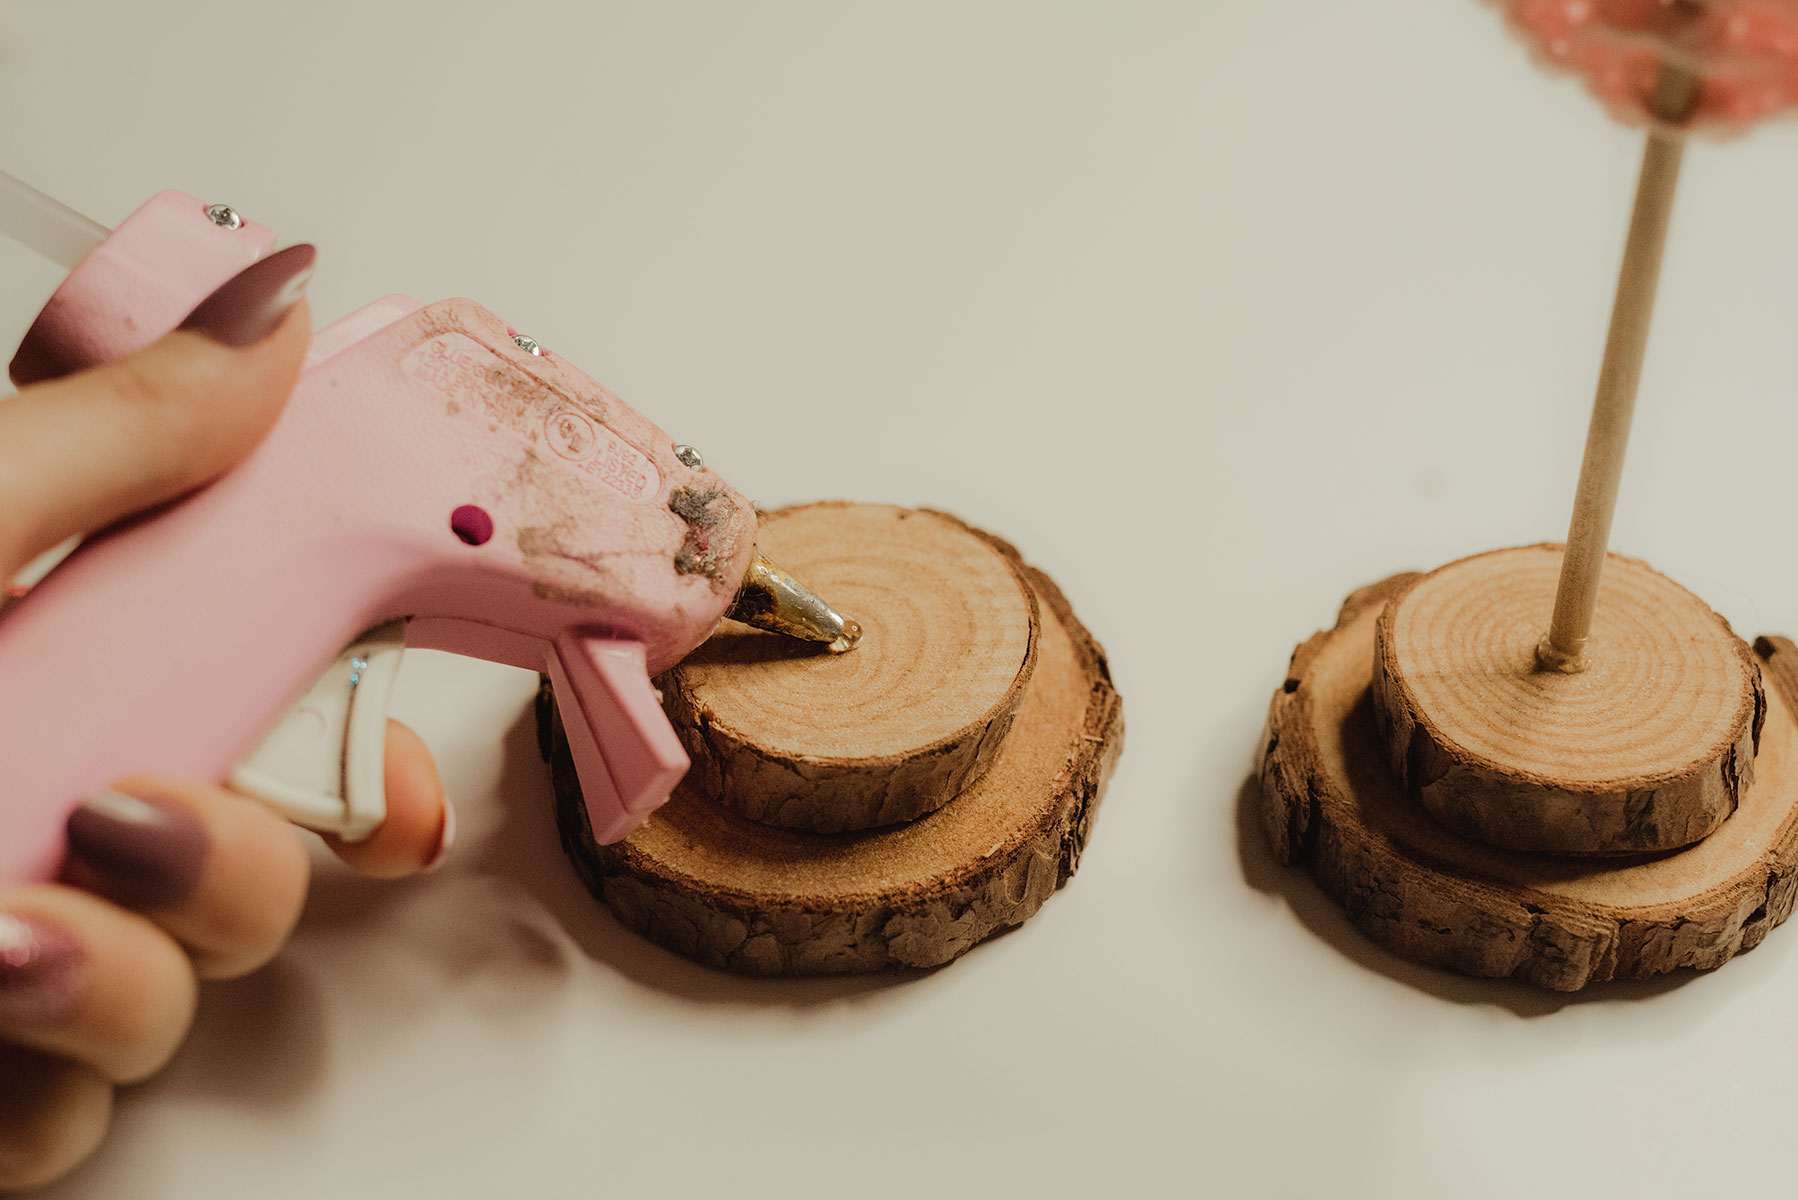
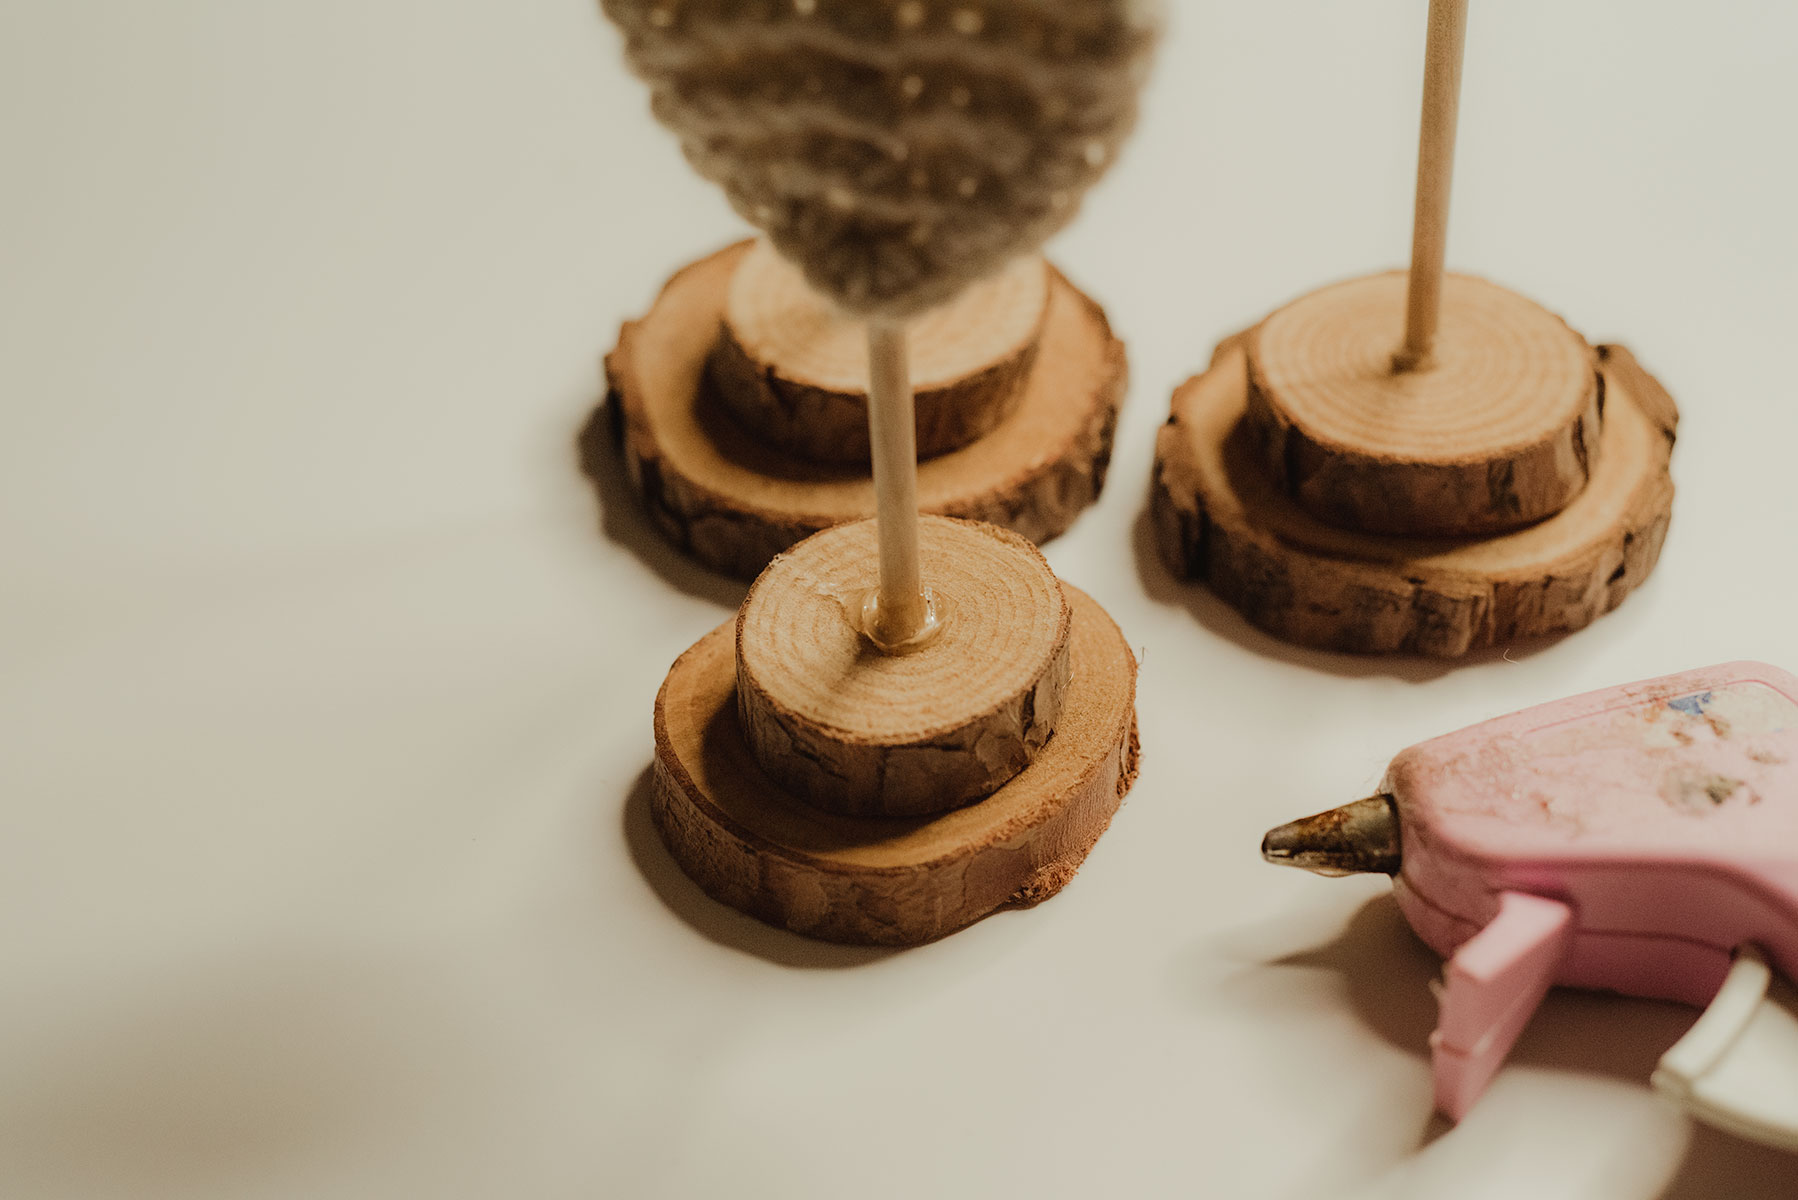
- Wood pile 3 big 3 small
- Rods 3 of them one 4inch, 5.5 inches, 6.5 inches
- Fake moss
- Hand saw
Abbreviations:
Ch(s) = Chain(s)
St(s) = Stitch(es)
Slst = Slip Stitch
Dec = Decrease
Sc =Single Crochet
Blo = Back loop only
Sk =Skip
Notes:
This pattern works in the back loops only unless stated otherwise. The chain space does not count as a stitch. The chain space is where you will add your rods.
Pattern
Please read notes section first.
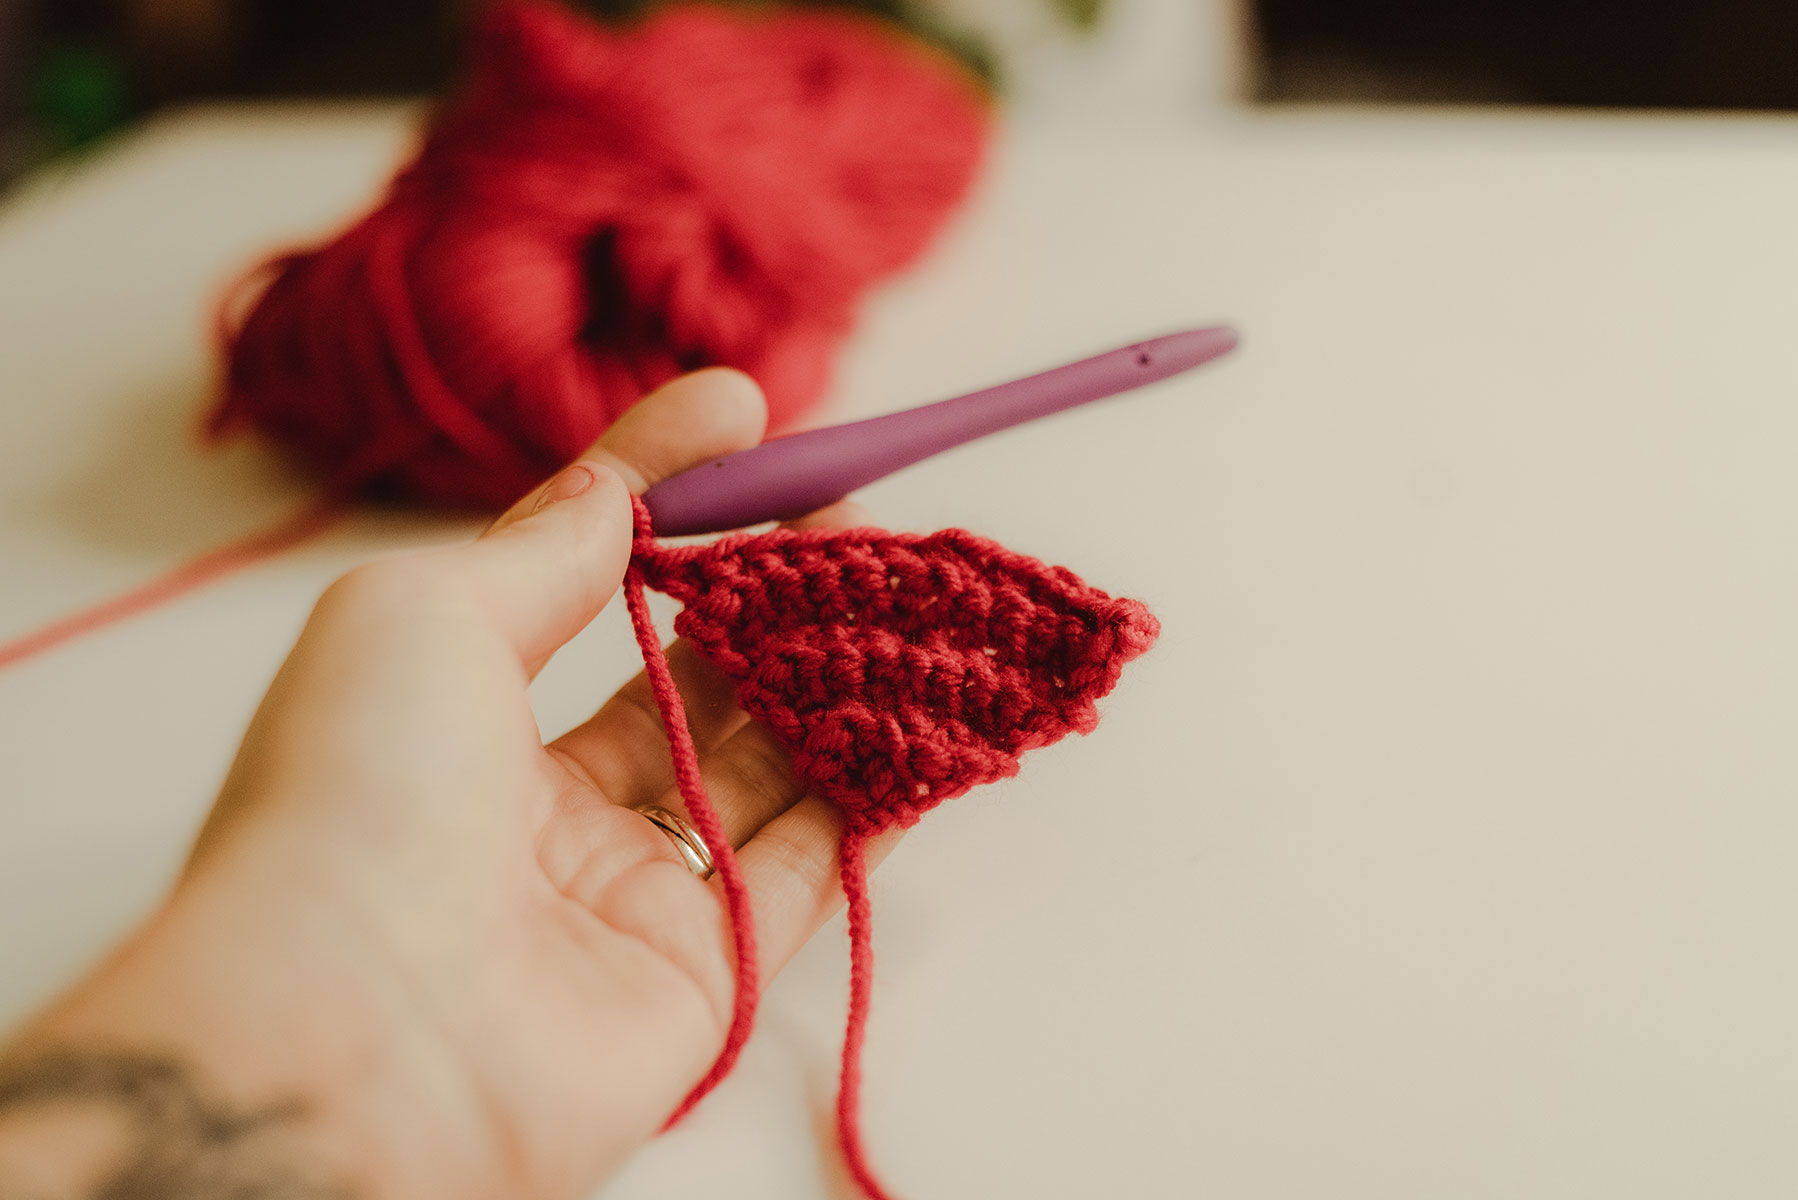
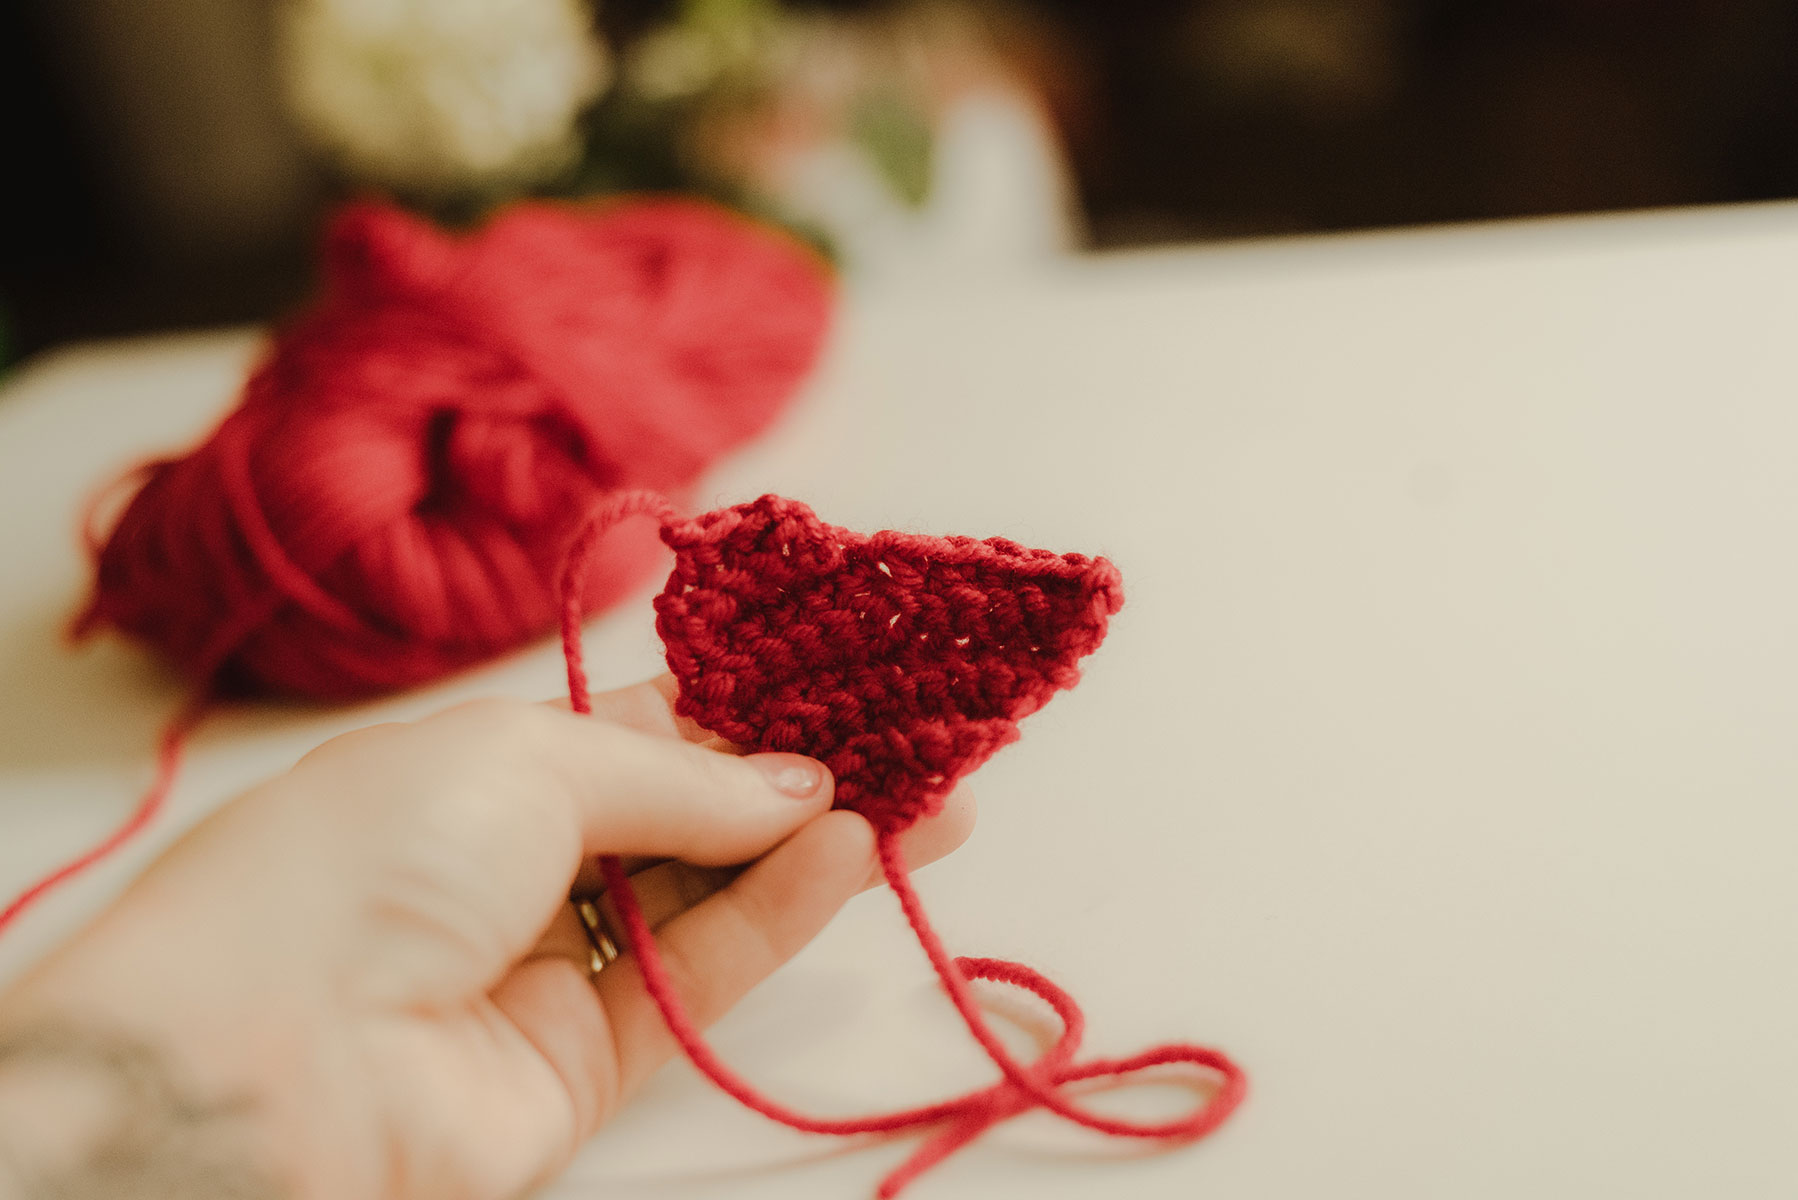
Small
Ch 2
Row 1: In the second ch from the hook (sc, ch 2, sc) all in the same ch(s) space. Ch 1 turn. (2 sc +ch 2)
Row 2: Working in the blo 2 sc in the first st. Ch 2 sk the previous c(s)h. In the blo 2 sc in the last st. Ch 1 turn. (4 sc+ ch21)
Row 3: 2 sc in the blo, in the blo sc in the next st. Ch 2 sk the previous ch(s), in the blo sc, 2 sc in the blo. Ch 1 turn. (6 sc+ ch 2)
Row 4: 2 sc in the blo, in the blo sc in the next 2 sts. Ch 2 sk the previous ch(s), in the blo sc in the next 2 sts, 2 sc in the blo. Ch 1 turn. (8 sc+ ch 2)
Row 5: 2 sc in the blo, in the blo sc in the next 3 sts. Ch 2 sk the previous ch(s), in the blo sc in the next 3 sts, 2 sc in the blo. Ch 1 turn. (10 sc+ ch 2)
Row 6: 2 sc in the blo, in the blo sc in the next 4 sts. Ch 2 sk the previous ch(s), in the blo sc in the next 4 sts, 2 sc in the blo. Ch 1 turn. (12 sc+ ch 2)
Row 7-8: In the blo sc in the next 6 sts, Ch 2 sk the previous ch(s). In the blo sc the next 6 sts. Ch 1 turn. (12 sc+ ch 2)
Row 9: In the blo dec, sc the next 2 sts in the blo, in the blo dec. Ch 1 turn (4 sc)
Row 10: In the blo dec twice. (2 sc) Fasten your yarn off.
Other side
Row 9: Attach your yarn in the blo and dec, sc the next 2 sts in the blo, in the blo dec. Ch 1 turn (4 sc)
Row 10: In the blo dec twice. (2 sc)
Do not fasten your yarn off. Sc around the whole heart. In the ch 1 space slst and at the point of the heart sc, ch 1, sc.
Medium
Ch 2
Row 1: In the second ch from the hook (sc, ch 2, sc) all in the same ch(s) space. Ch 1 turn. (2 sc +ch 2)
Row 2: Working in the blo 2 sc in the first st. Ch 2 sk the previous ch(s). In the blo 2 sc in the last st. Ch 1 turn. (4 sc+ ch 2)
Row 3: 2 sc in the blo, in the blo sc in the next st. Ch 2 sk the previous ch(s), in the blo sc, 2 sc in the blo. Ch 1 turn. (6 sc+ ch21)
Row 4: 2 sc in the blo, in the blo sc in the next 2 sts. Ch 2 sk the previous ch(s), in the blo sc in the next 2 sts, 2 sc in the blo. Ch 1 turn. (8 sc+ ch 2)
Row 5: 2 sc in the blo, in the blo sc in the next 3 sts. Ch 2 sk the previous ch(s), in the blo sc in the next 3 sts, 2 sc in the blo. Ch 1 turn. (10 sc+ ch 2)
Row 6: In the blo sc in the next 5 sts, Ch 2 sk the previous ch(s). In the blo sc the next 5 sts. Ch 1 turn. (10 sc+ ch 2)
Row 7: 2 sc in the blo, in the blo sc in the next 4 sts. Ch 1 sk the previous ch, in the blo sc in the next 4 sts, 2 sc in the blo. Ch 1 turn. (12 sc+ ch 2)
Row 8-9: In the blo sc in the next 6 sts, Ch 2 sk the previous ch(s). In the blo sc the next 6 sts. Ch 1 turn. (12 sc+ ch 2)
Row 8: In the blo dec, sc the next 2 sts in the blo, in the blo dec. Ch 1 turn (4 sc)
Row 9: In the blo dec twice. (2 sc) Fasten your yarn off.
Other side
Row 8: Attach your yarn in the blo and dec, sc the next 2 sts in the blo, in the blo dec. Ch 1 turn (4 sc)
Row 9: In the blo dec twice. (2 sc)
Do not fasten your yarn off. Sc around the whole heart. In the ch 1 space slst and at the point of the heart sc, ch 1, sc.
Big
Ch 2
Row 1: In the second ch from the hook (sc, ch 2, sc) all in the same ch(s) space. Ch 1 turn. (2 sc +ch 2)
Row 2: Working in the blo 2 sc in the first st. Ch 2 sk the previous ch(s). In the blo 2 sc in the last st. Ch 1 turn. (4 sc+ ch 2)
Row 3: 2 sc in the blo, in the blo sc in the next st. Ch 2 sk the previous ch(s), in the blo sc, 2 sc in the blo. Ch 1 turn. (6 sc+ ch21)
Row 4: 2 sc in the blo, in the blo sc in the next 2 sts. Ch 2 sk the previous ch(s), in the blo sc in the next 2 sts, 2 sc in the blo. Ch 1 turn. (8 sc+ ch 2)
Row 5: In the blo sc in the next 4 sts, Ch 2 sk the previous ch(s). In the blo sc the next 4 sts. Ch 1 turn. (8 sc+ ch 2)
Row 6: In the blo sc in the next 5 sts, Ch 2 sk the previous ch(s). In the blo sc the next 5 sts. Ch 1 turn. (10 sc+ ch 2)
Row 7: In the blo sc in the next 5 sts, Ch 2 sk the previous ch(s). In the blo sc the next 5 sts. Ch 1 turn. (10 sc+ ch 2)
Row 8: 2 sc in the blo, in the blo sc in the next 4 sts. Ch 1 sk the previous ch, in the blo sc in the next 4 sts, 2 sc in the blo. Ch 1 turn. (12 sc+ ch 2)
Row 9: 2 sc in the blo, in the blo sc in the next 5 sts. Ch 1 sk the previous ch, in the blo sc in the next 5 sts, 2 sc in the blo. Ch 1 turn. (14 sc+ ch 2)
Row 10-11: In the blo sc in the next 7 sts, Ch 2 sk the previous ch(s). In the blo sc the next 7 sts. Ch 1 turn. (14 sc+ ch 2)
Row 12: In the blo dec, sc the next 3 sts in the blo, in the blo dec. Ch 1 turn (5 sc)
Row 13: In the blo dec, sc in the blo, Dec in the blo. (3 sc) Fasten your yarn off.
Other side
Row 12: Attach your yarn in the blo and dec, sc the next 3 sts in the blo, in the blo dec. Ch 1 turn (5 sc)
Row 13: In the blo dec, sc in the blo, Dec in the blo. (3 sc)
Do not fasten your yarn off. Sc around the whole heart. In the ch 1 space slst and at the point of the heart sc, ch 1, sc.
Example Pictures

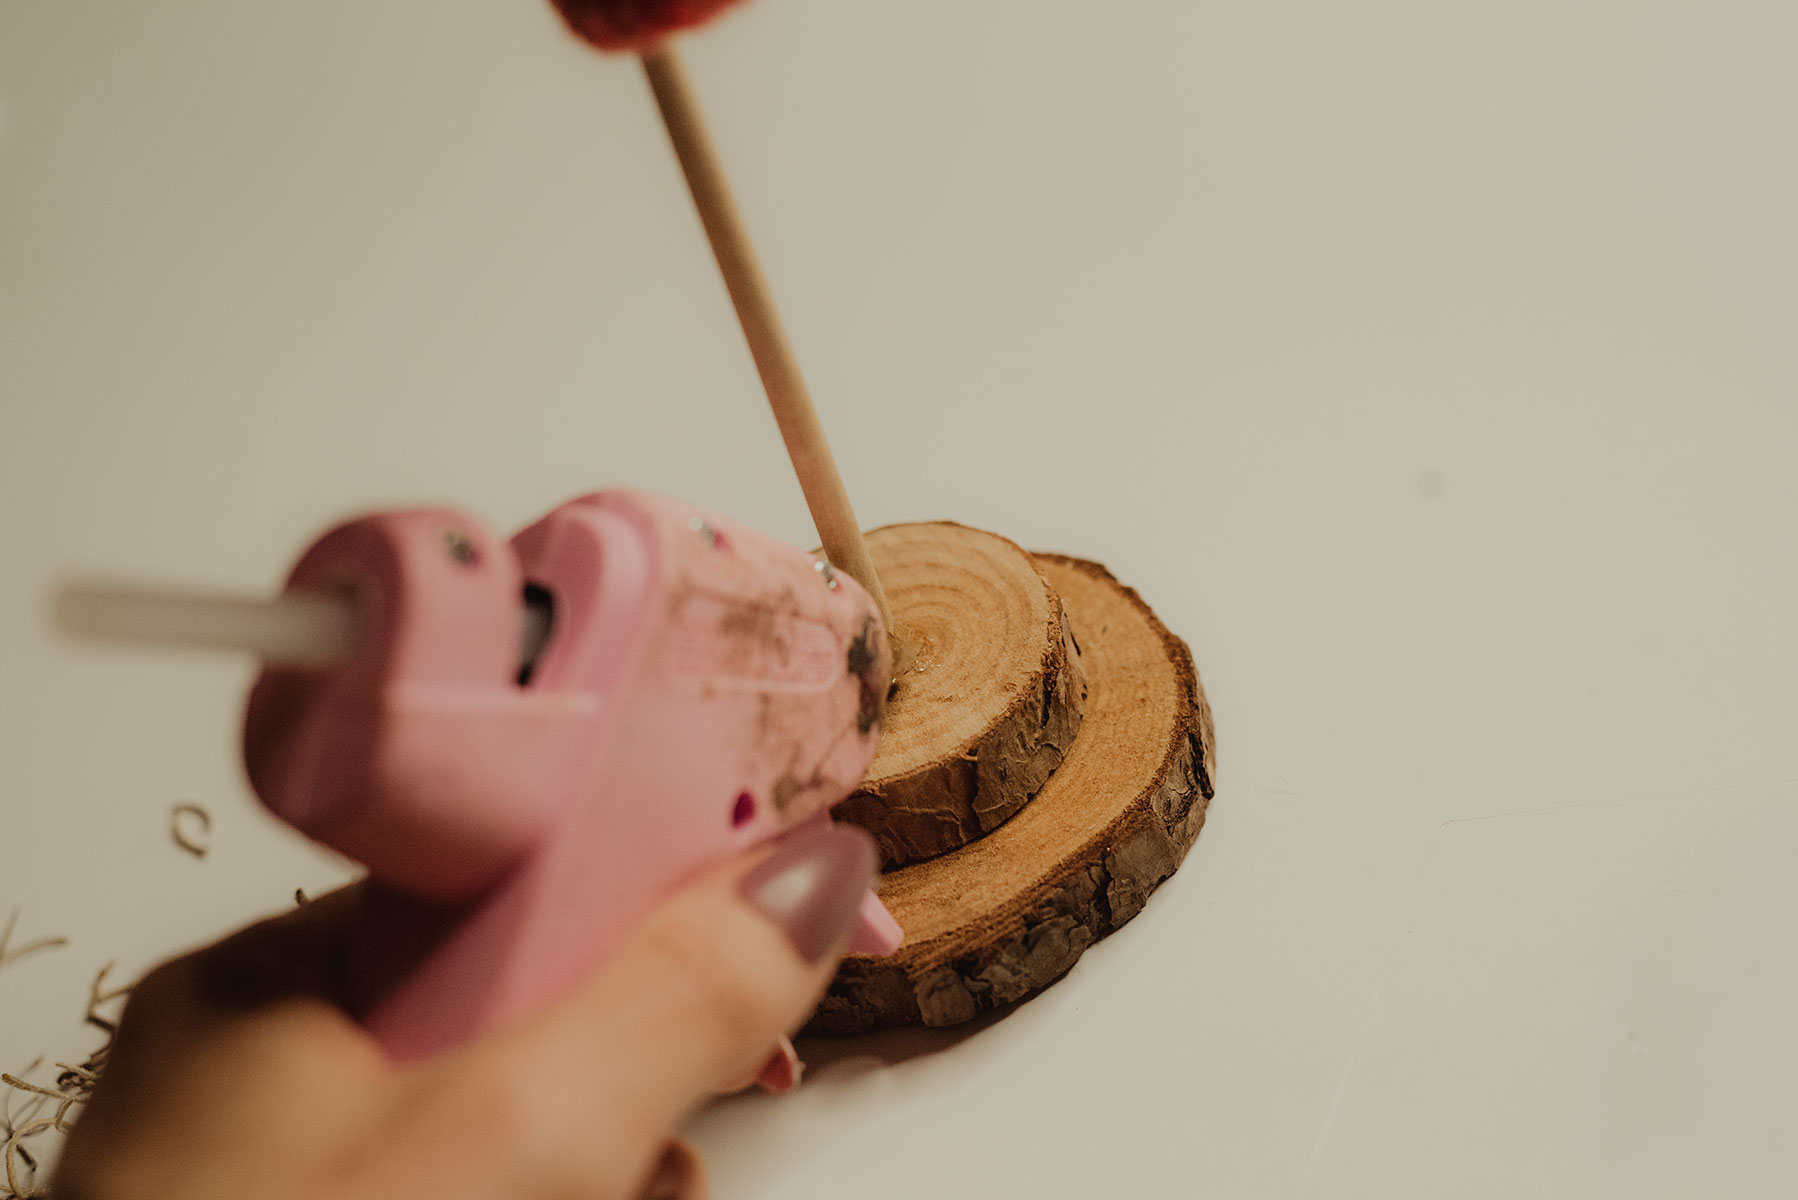
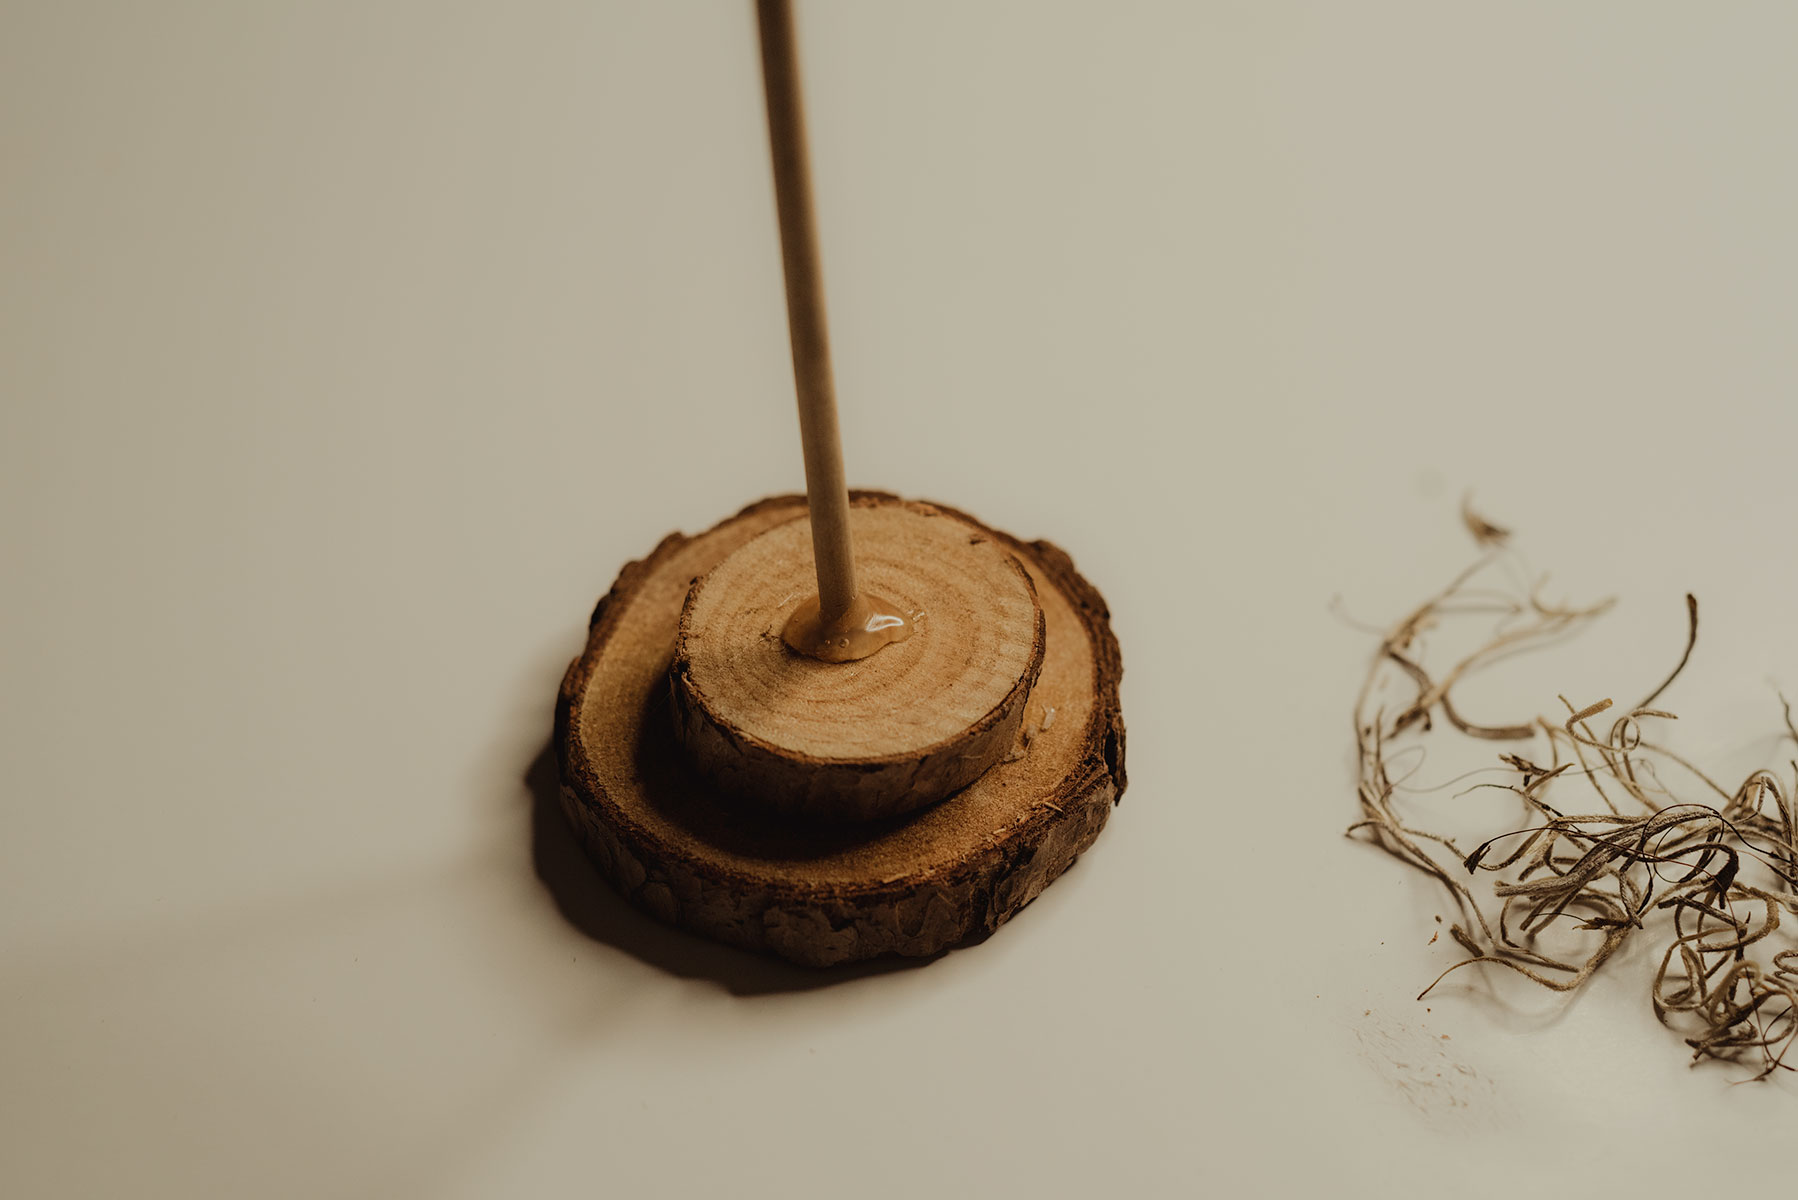
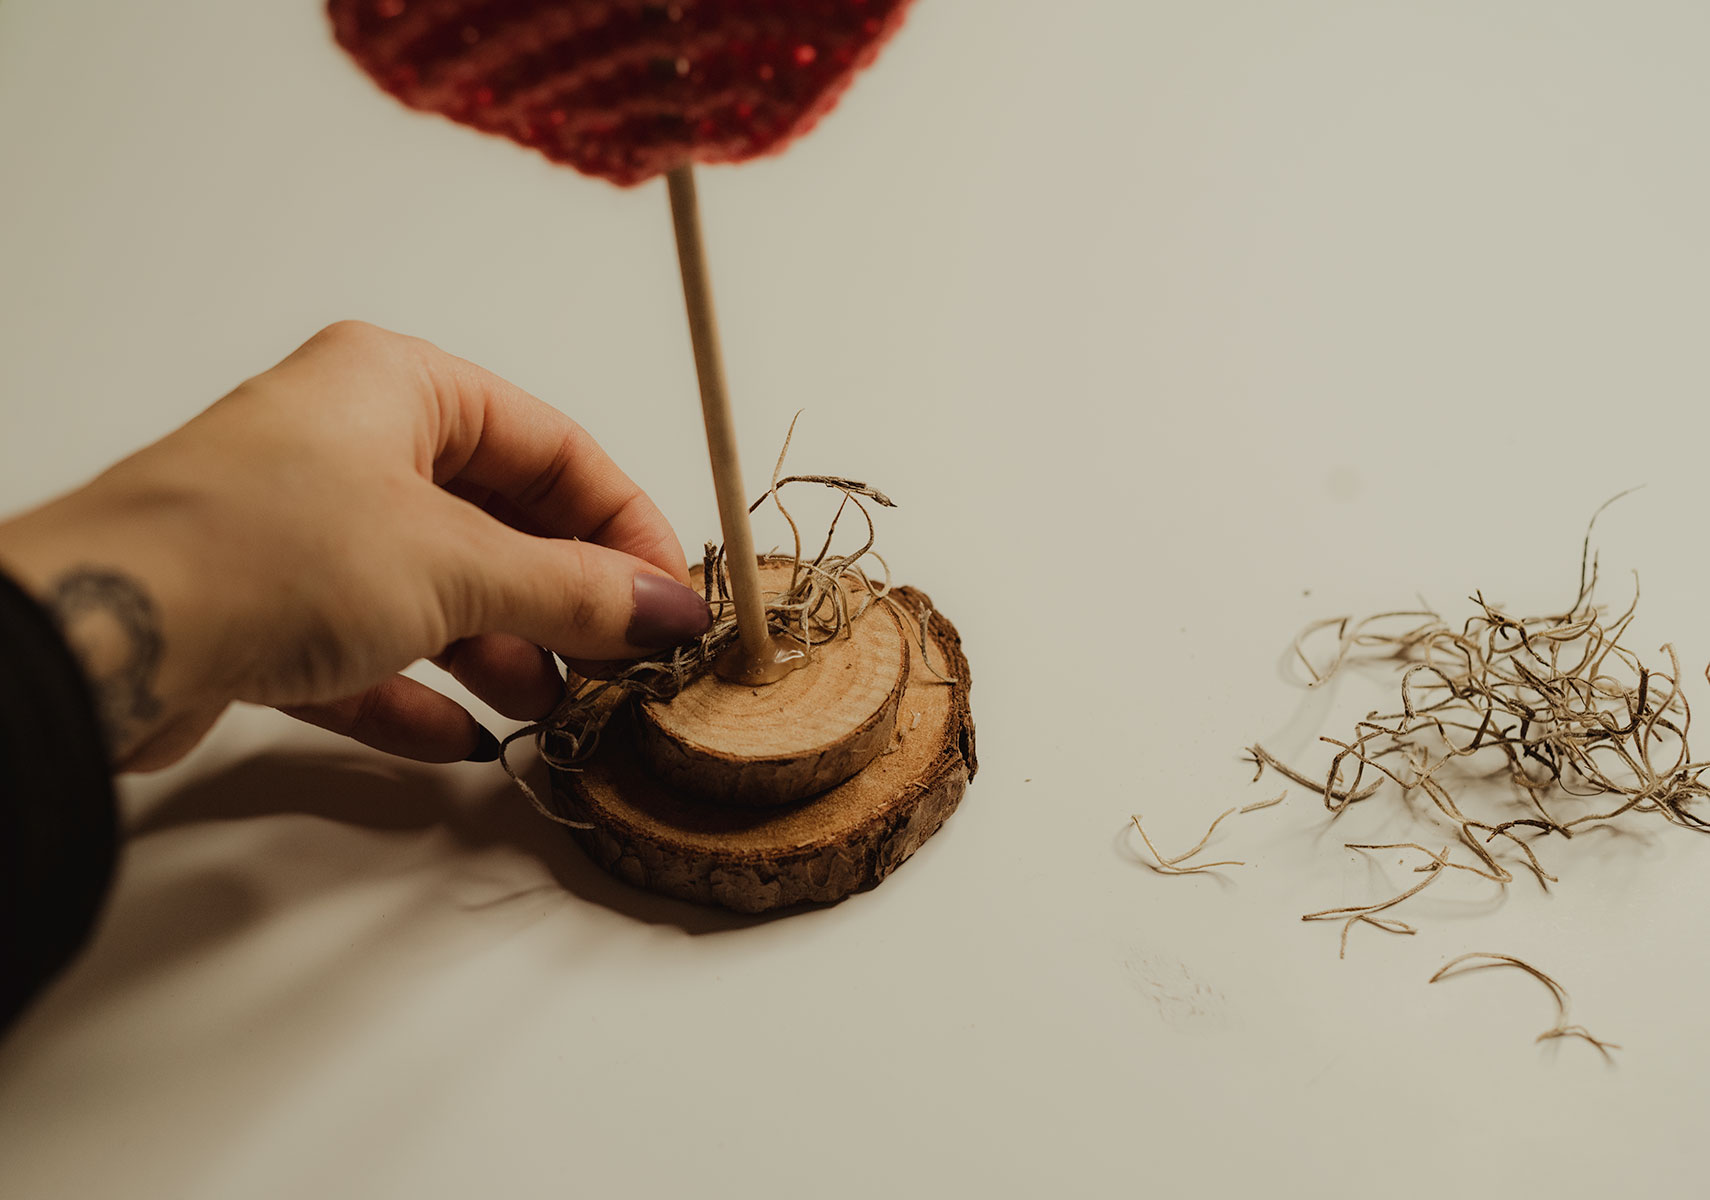
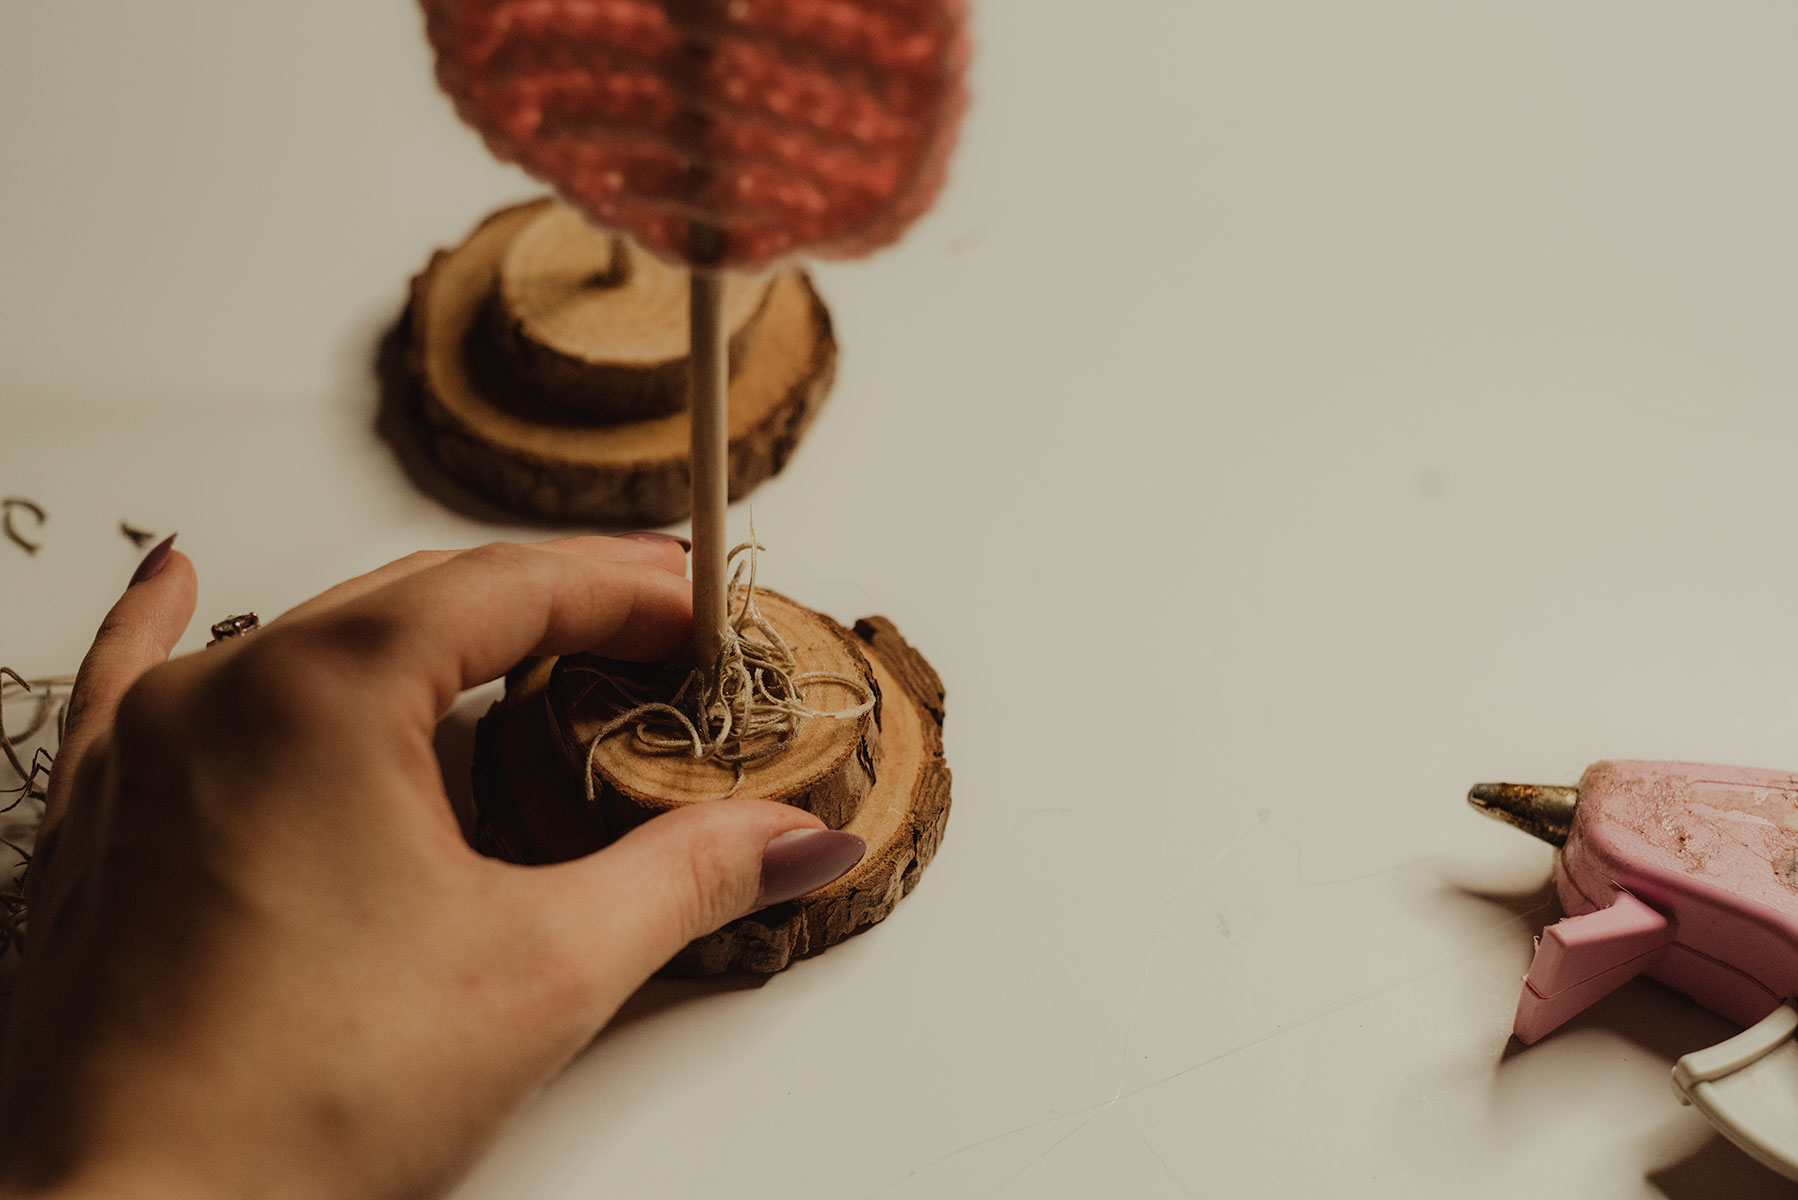
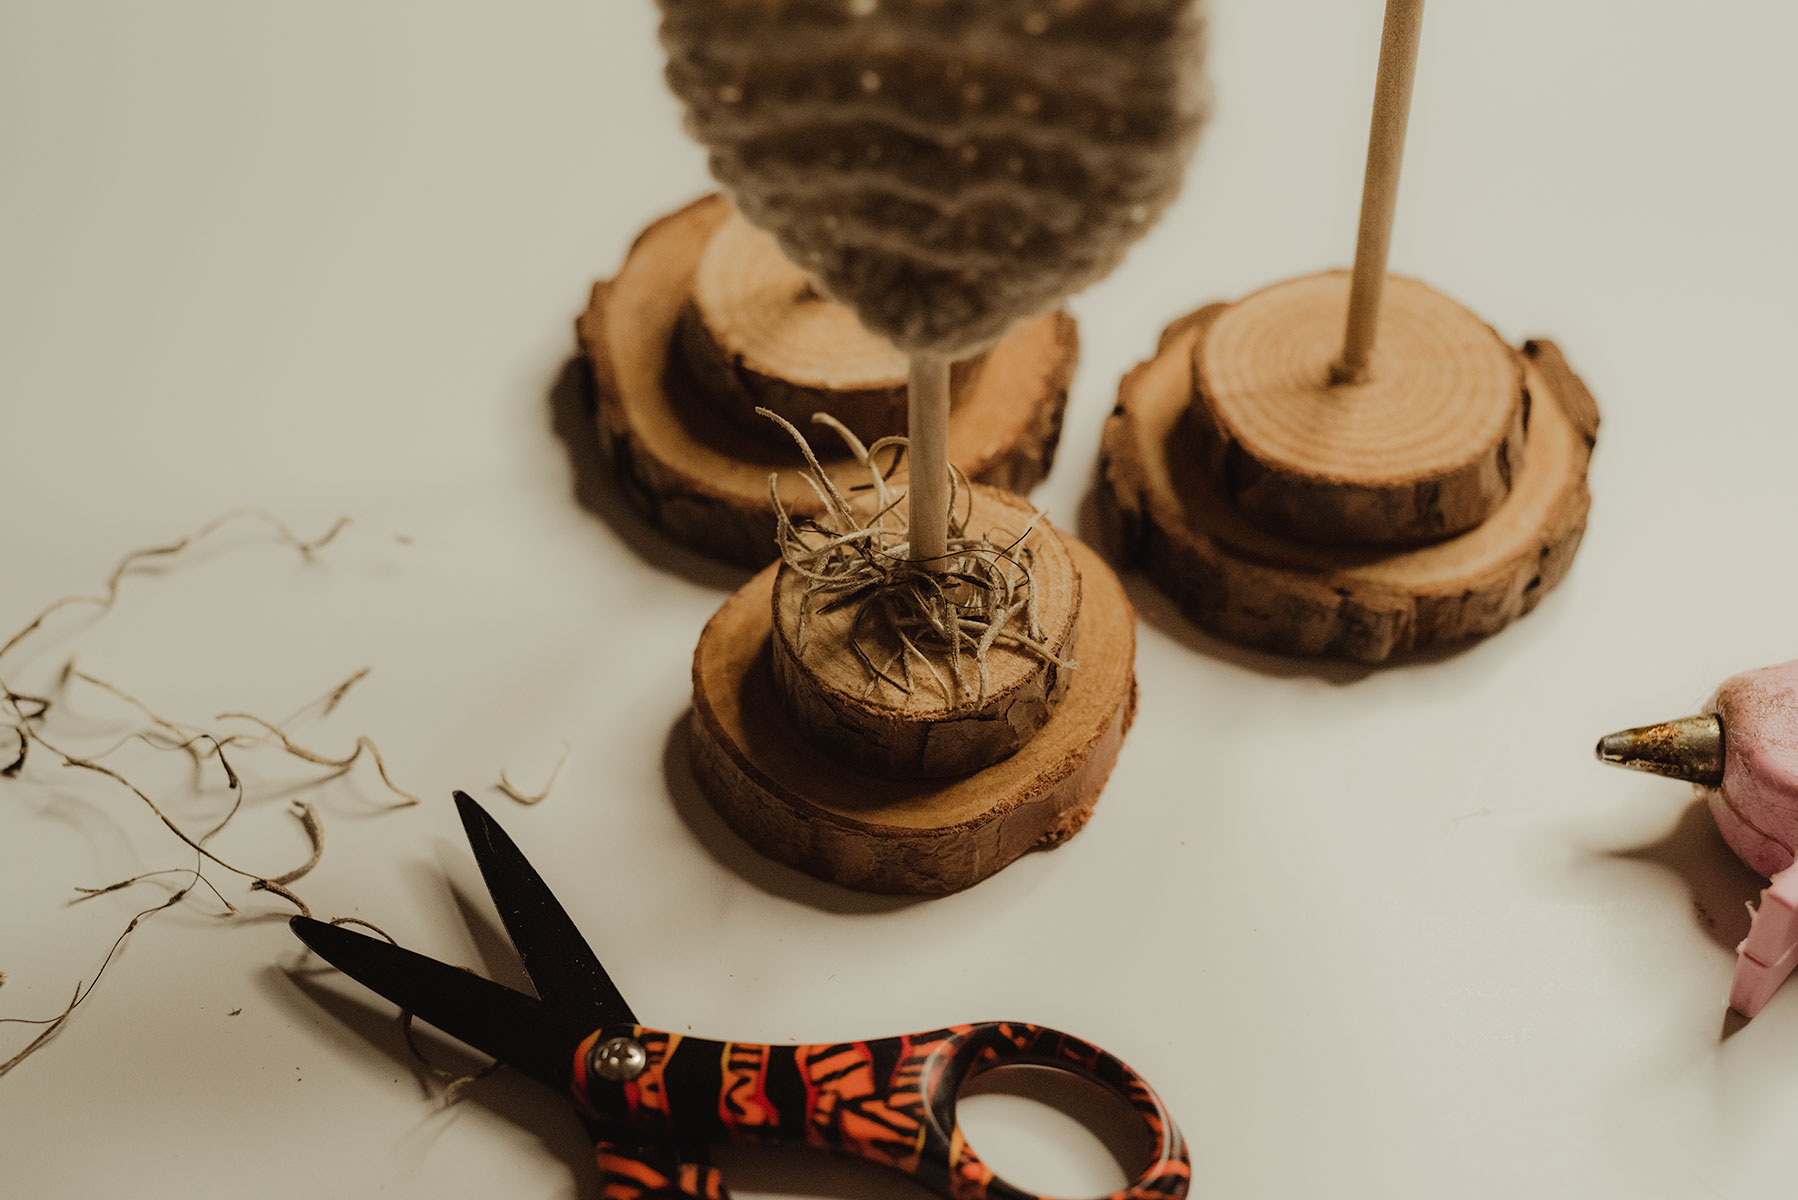
To create the wood stand, take the big piece of wood. Add some hot glue on top in the middle. Now add the small wood piece over top to create the tier. Once it is dry add a small dab of hot glue to the center of the top tier. Now add the rod and let it dry. Once the rod is dry add some more hot glue around the rod to give it more support. You can now add some of the Fake moss to hide the hot glue.
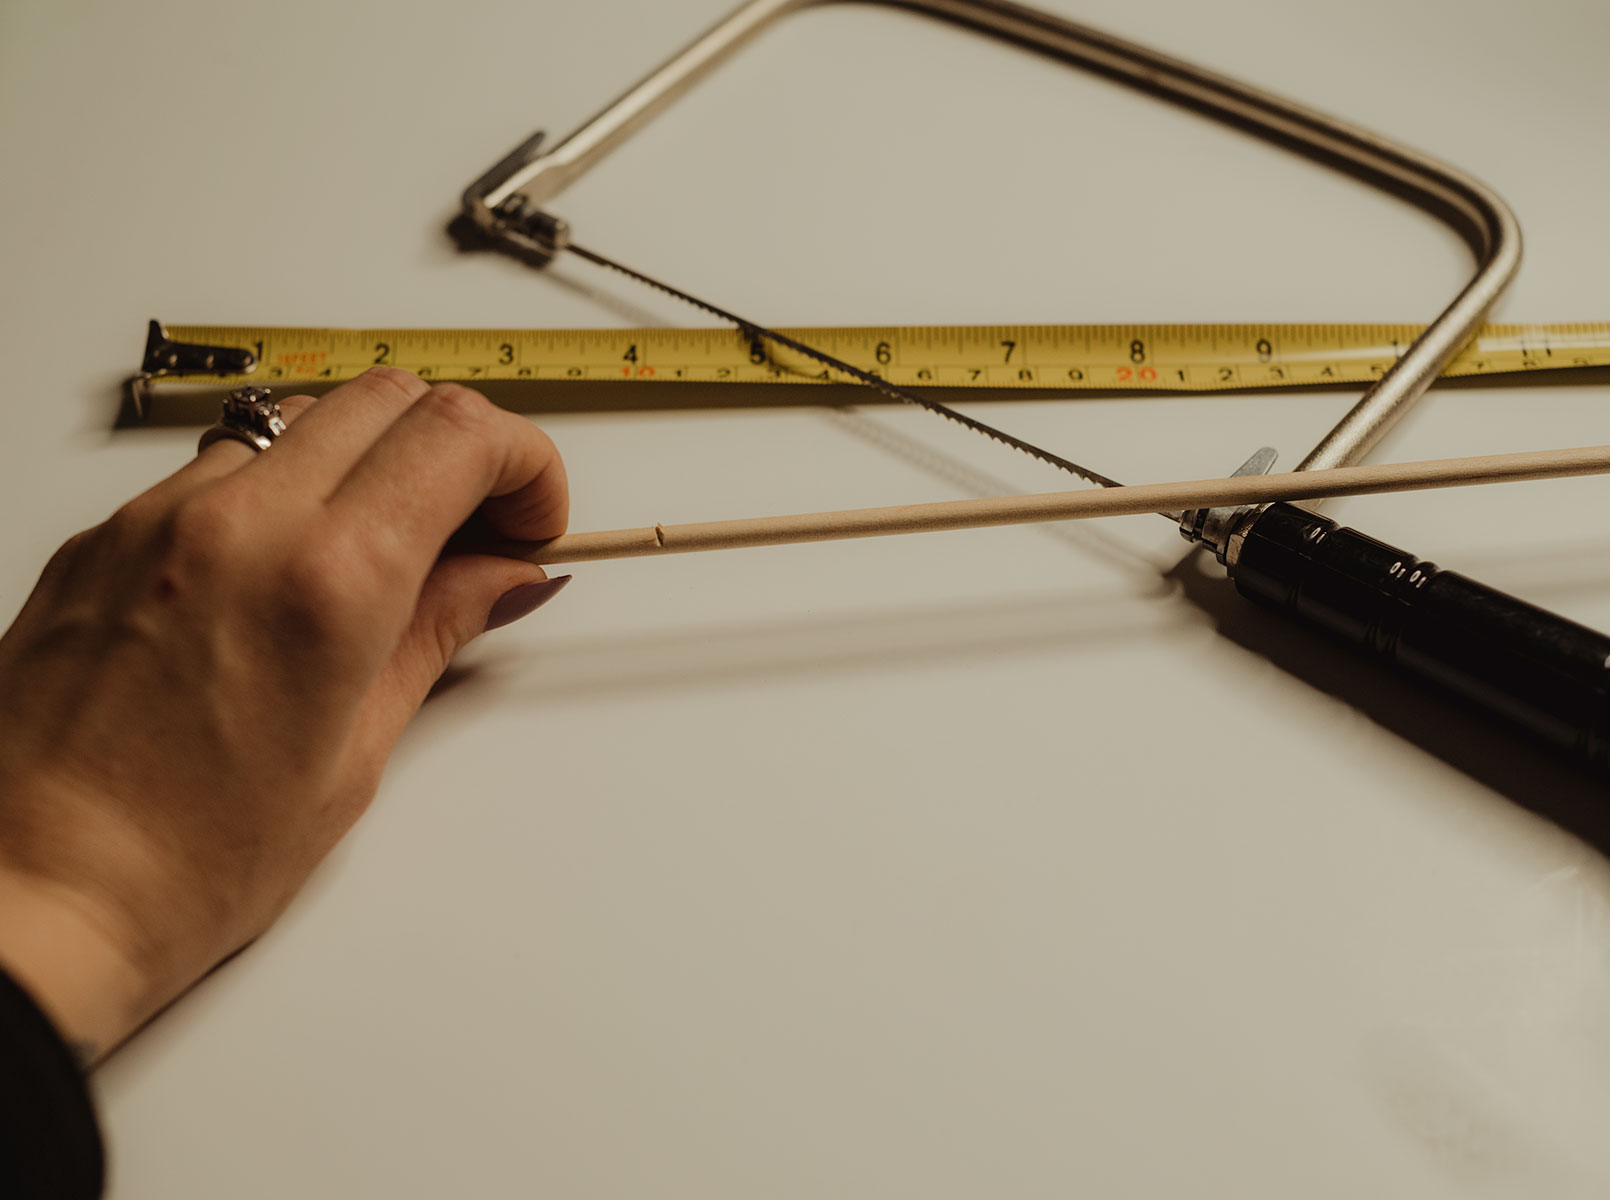
Cut rods to
Small rod. 4 Inches
Medium rod. 5.5 Inches
Big rod. 6.5 Inches
Hope you enjoy this Valentine’s decor pattern, which adds a touch of romantic flair to your celebration.
Copyright © 2019 Oh Another Craftyish Blog by Tawnya Myers, all rights reserved
Hey there! Just a heads up, I own all the copyrights to this pattern and the photos. Feel free to sell whatever you make with it! If you do sell it, I’d really appreciate it if you drop a link back to my post. Just remember, this is totally my work—I’ve put a ton of effort into creating these patterns. Happy Crocheting!