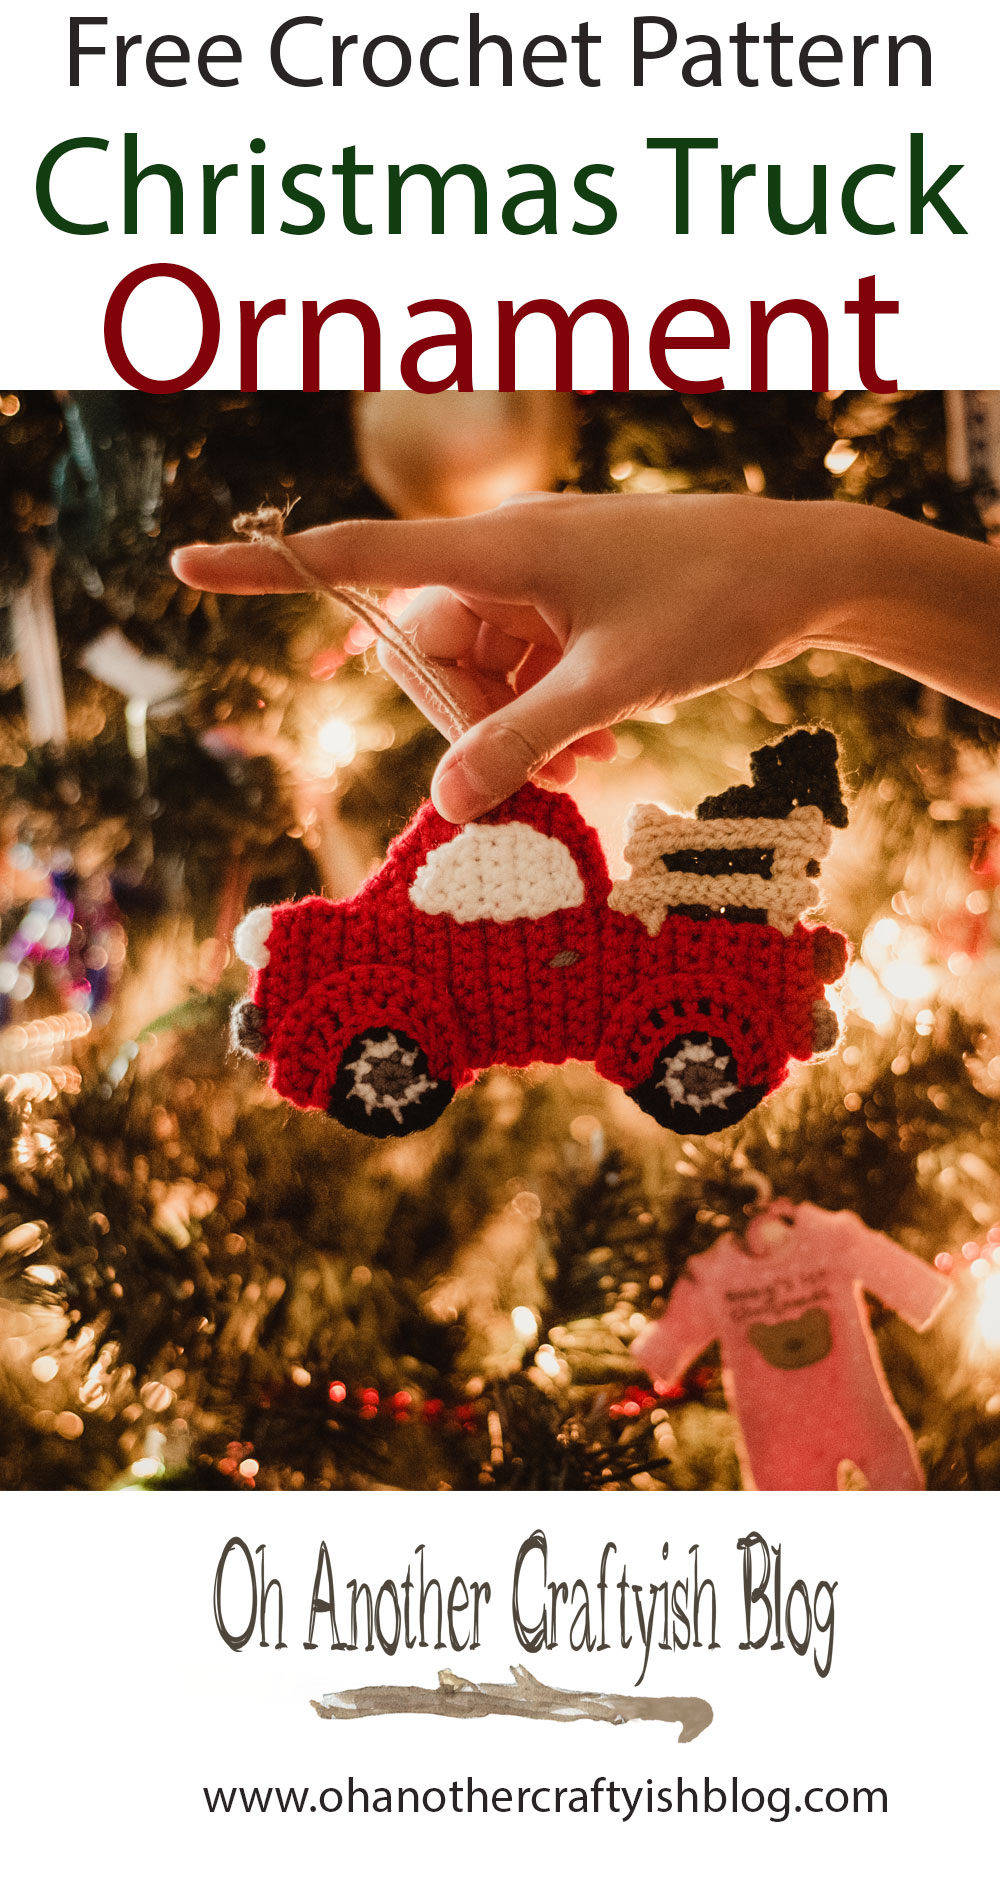
Unleash your creativity this holiday season to create your own Christmas truck applique! With a detailed step-by-step guide, you’ll dive into the joyful world of crochet and create something truly unique. Imagine adorning a festive wreath or transforming a plain sweater into a delightful holiday masterpiece your options are boundless! Embrace the spirit of Christmas and let your imagination run wild!
Pin it and save for latter
I love the endless ideas you can use appliques with. They offer a unique way to personalize and enhance various projects. These range from clothing to home decor and beyond. You can embellish a plain t-shirt. Add character to a tote bag. Create stunning wall art. The possibilities are truly limitless. Applique can tell its own story. It makes every creation feel special and one-of-a-kind. This is why I find such joy in using them. When you create your own Christmas truck applique, I hope you make it special.
I truly hope you’ve loved this pattern! If you create your own Christmas truck applique I’d be thrilled if you shared it on my Facebook and Instagram. Don’t forget to like and follow to stay in the loop for exciting new patterns! And remember to use the hashtag #crochetchristmastruckapplique when you share your lovely creations!
Create your own Christmas truck applique below with step-by-step instructions.
Supplies:
- Hobby lobby I love this yarn. It is Weight 4/ medium with 355 yds and 7 oz. The colors include Fire Red, White, Black, Graphite, Toasted Almond, Forrest Green, and Cranberry.
- 3.25mm (D) Hook (or hook to obtain the gauge)
- Tapestry Needle
- Hot glue gun
Abbreviations:
Ch(s) = Chain(s)
St(s) = Stitch(es)
Hdc = Half Double Crochet
Dc = Double Crochet
Slst = Slip Stitch
Dec = Decrease
Sc =Single Crochet
Mc = Magic Circle
Notes:
Rounds are worked in continuous rounds unless stated otherwise.
Pattern:
Truck Body
In color fire red ch 8
Row:1 Sc in 2nd ch from hook. Sc the next 6 sts. Ch 1 turn. (7)
Row 2-12: Sc in each st across. Ch 1 turn. (7)
Row 13: Sc in each st across. ch 7, turn. (7 sts, 7 ch)
Row 14: 2 Sc in 2nd ch from hook, sc the next 12 sts. Ch 1 turn. (14)
Row 15: Sc in the next 13 sts. 2 sc in the last st. Ch 1 turn. (15)
Row 16: Sc in each st across. Ch 1 turn. (15)
Row 17: Sc in the next 14 sts, 2 sc in the last st. Ch 1 turn. (16)
Row 18-21: Sc in each st across. Ch 1 turn. (16)
Row 22: Dec, sc in the next 14 sts. Ch 1 turn. (15)
Row 23: Sc in the next 13 sts, dec. ch 1 turn. (14)
Row 24: Sc in each st across. Ch 1 turn. (14)
Row 25: Sc in the next 12 sts, dec. Ch 1 turn. (13)
Row 26: Dec, sc in the next 11 sts. Ch 1 turn. (12)
Row 27: Sc in the next 10 sts, dec. Ch 1 turn. (11)
Row 28: Dec, sc in the next 9 sts. Ch 1 turn. (10)
Row 29-32: Sc in each st across. Ch 1 turn. (10)
Row 33: Sc in the next 8 sts, dec. Ch 1 turn. (9)
Row 34: Sc in each st across. Ch 1 turn. (9)
Row 35: Sc in the next 7 sts, dec. Ch 1 turn. (8)
Row 36: Dec, sc in the next 6 sts. Ch 1 turn. (7)
Row 37: Sc in the next 5 sts, dec. Ch 1 turn. (6)
Row 38: Dec, sc in the next 4 sts. Ch 1 turn. (5)
(Fasten off and weave in the tail.)
Front tire/fender
Round 1: In color graphite Mc 6 sc. (6)
Round 2: switch to color white. 2 sc in each st around. (12)
Round 3: switch to color black. *hdc, 2 hdc, repeat from * (16)
Round 4: switch to color fire red. Sc in the next 4 sts, 2 hdc, hdc, 2 hdc, hdc, 2 dc in the next 3 sts. Ch 1 turn. (16)
Round 5: sc in the next 5 sts, 2 sc, sc in the next 5 sts, slst the last 5 sts. (16)
( fasten off and weave in the tail.)
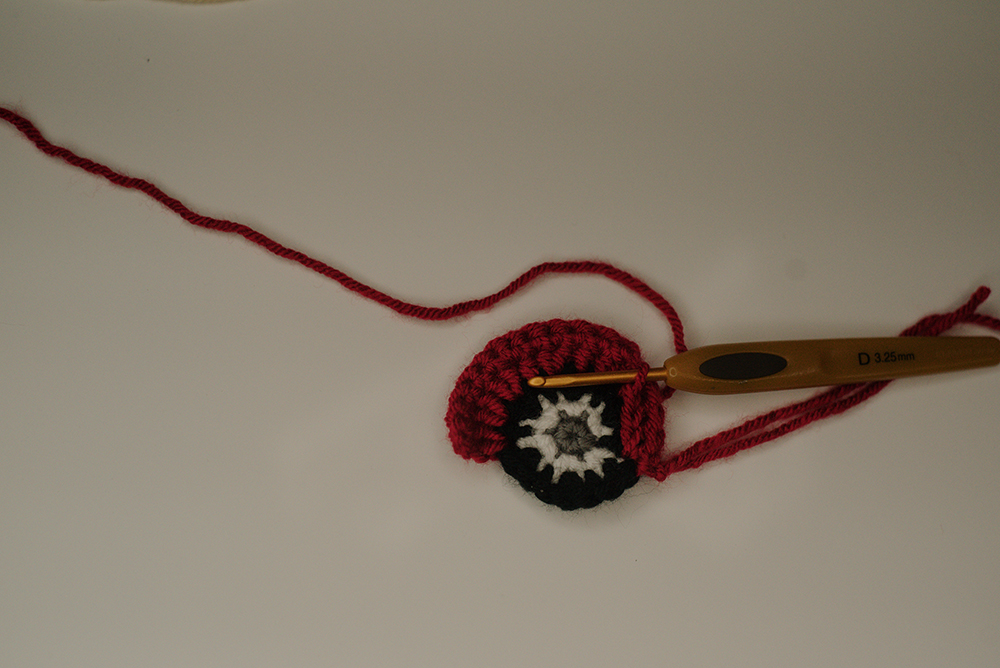
Back tire/fender
Round 1: In color graphite Mc 6 sc. (6)
Round 2: switch to color white. 2 sc in each st around. (12)
Round 3: switch to color black. *hdc, 2 hdc, repeat from * (16)
Round 4: switch to color fire red. * sc, 2sc, repeat from * 9 more times. Ch 1 turn. (16)
Round 5: sc in each st across. (16)
( fasten off and weave in the tail.
Details
We are going to surface crochet on to the tires.
Attach your yarn between round 3-4 where we started the fender. slst in each st around for a total of 16. (16)
Window
In color white ch 6
Row 1: In the 2nd ch from hook sc, sc in the next 4 sts. Ch 1 turn. (5)
Row 2: Sc in the next 4 sts, 2 sc in the last st. Ch 1 turn. (6)
Row 3-4: Sc in each st across. Ch 1 turn. (6)
Row 5: Dec, sc in the next 4 sts. Ch 1 turn. (5)
Row 6: sc in each st across. Ch 1 turn. (5)
Row 7: Dec, sc in the next 3 sts. Ch 1 turn. (4)
Row 8: Sc in the next 2 sts, dec. Ch 1 turn. (3)
Row 9: Dec, sc in the next sc. ch 1 turn. (2)
Row 10: Dec. (1)
( Fasten off and leave a long tail for sewing on to truck.)
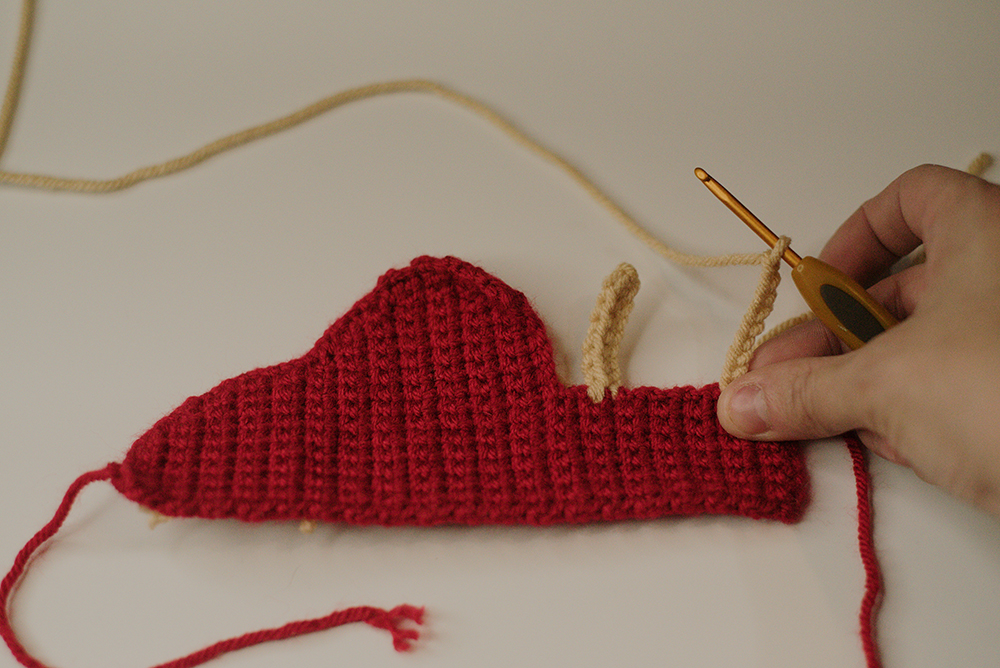
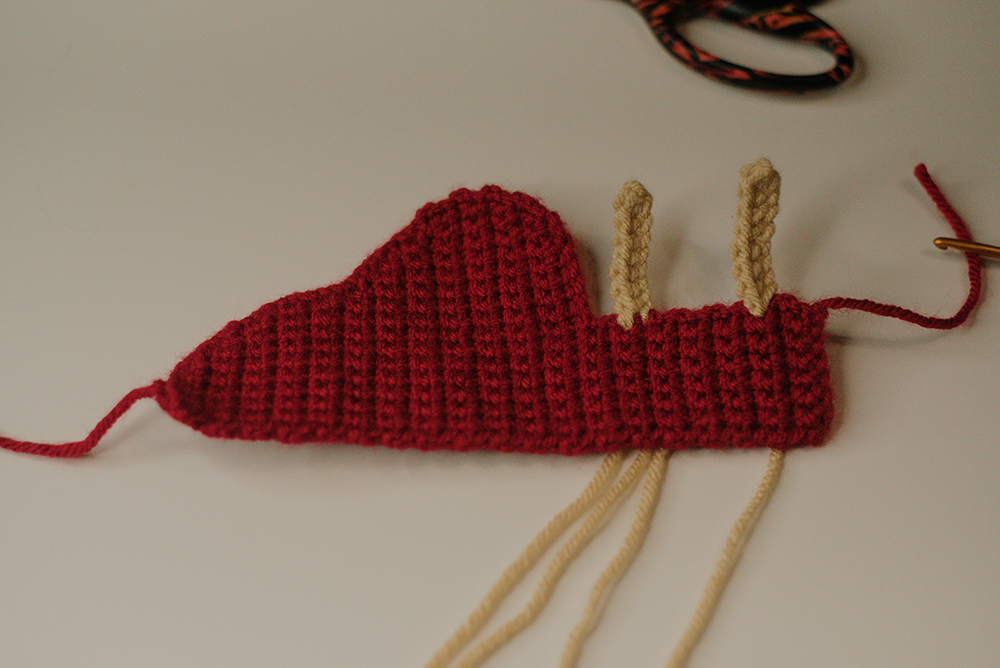
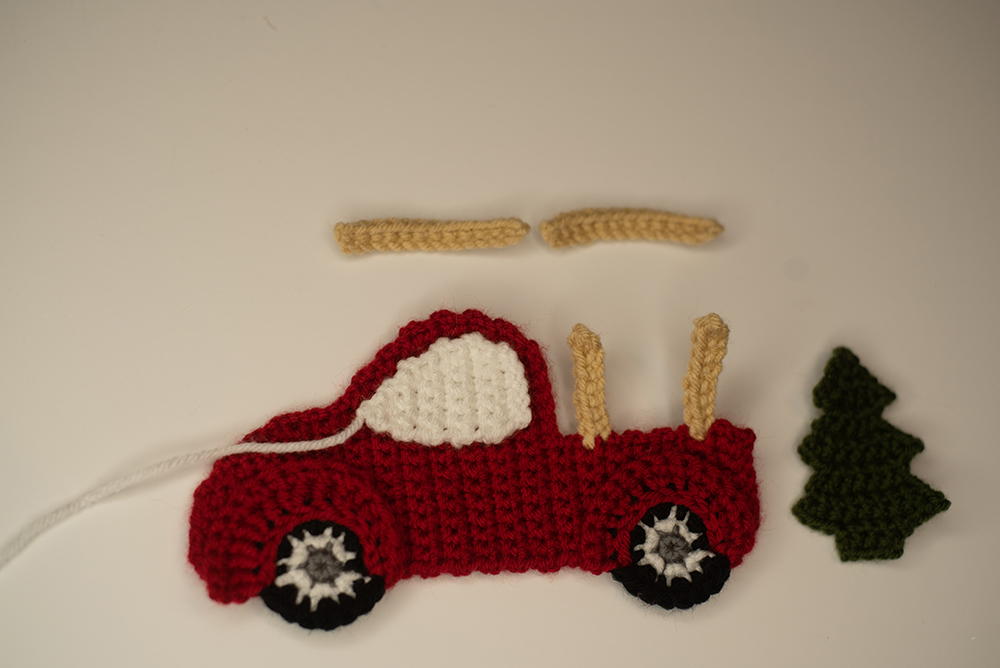
Wood Frame
Set 1:
Attach color toasted almond yarn to the truck between row 3-4. Ch 9.
Row 1: Sc in 2nd ch from hook. Sc in the next 7 sts. Slst where you joined your yarn and Fasten off and weave in ends
Set 2:
Attach color toasted almond yarn to the truck between row 11-12 Ch 9.
Row 1: Sc in 2nd ch from hook. Sc in the next 7 sts. Slst where you joined your yarn and Fasten off and weave in ends
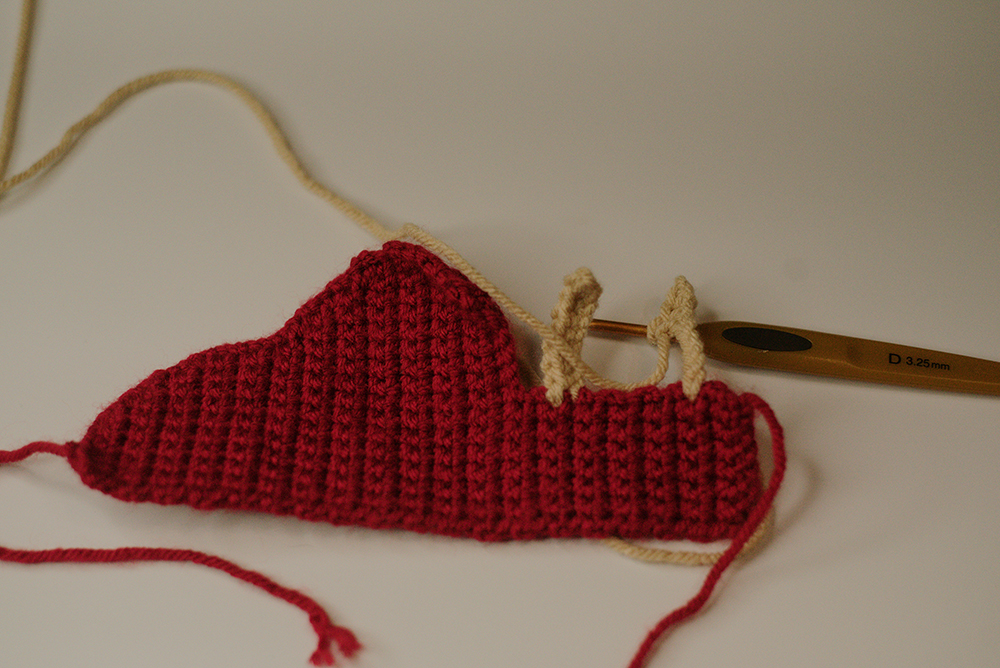
Set 3:
Make two
In color toasted almond ch 13.
Row 1: In the 2nd ch from hook sc. sc the next 11 sts. Fasten off and weave in your ends. (12)
Bumper
Front Bumper
Using color graphite attach your yarn to the 2nd to the last st from the bottom. Sc in the same space as you attached your yarn. Sc in the last st and fasten off and weave in your tail.
Back Bumper
Using color graphite attach your yarn to the bottom of the truck bed. Add 2 sc in the same st you attached your yarn. 2 sc in the next st and fasten off and weave in your tail.
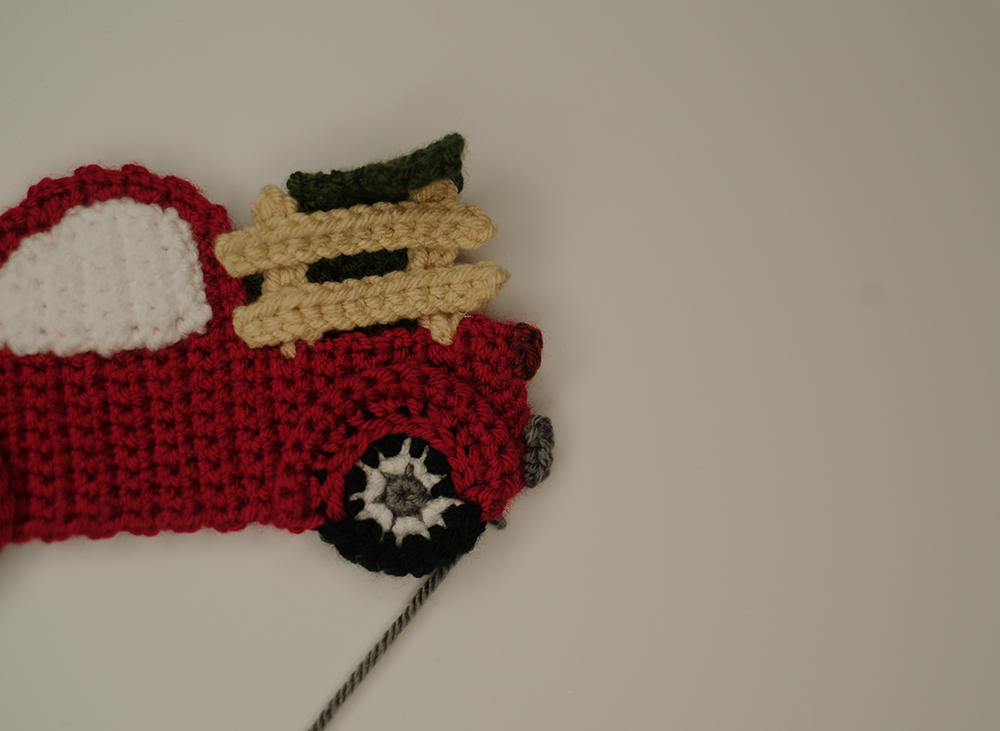
Lights
Tail light
Using color Cranberry attach your yarn to the 2nd to the last st from the top of the truck bed. Sc in the same st you attached your yarm. Sc in the next st and fasten off and weave in your tail.

Headlight
Using color white attach your yarn to the first st. slst in the same st you attached your yarn. Sc in the next st and fasten off and weave in your tail.
Door handle
We are going to surface slst.
In color graphite Attach your yarn to Row 16 and slst. Slst in row 17 and 18. Fasten off and tie off.
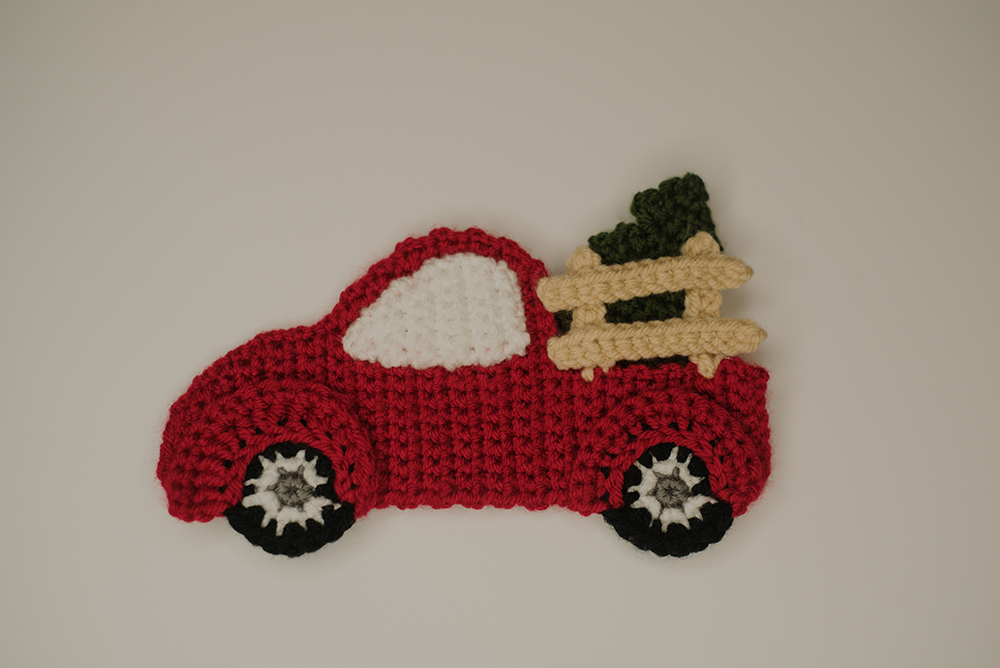
Christmas Tree
In color white Ch 2
Row 1: 2 sc in the 2nd ch from hook. Ch 1 turn. (2)
Row 2: 2 sc in each st across. Ch 1 turn. (4)
Row 3: Sc in each st across. Ch 1 turn. (4)
Row 4: 2 sc in the first st, sc the next 2 sts, 2 sc in the last st. Ch 1 turn. (6)
Row 5: slst the next 2 sts, ch 1, 2sc in the next 2 sts, skip the last 2 its. ch 1 turn. (4)
Row 6: 2 sc in the fist st, sc in the next 2 its, 2 sc in the last. Ch 1 turn. (6)
Row 7: sc each st in each st across. Ch 1 turn. (6)
Row 8: 2 sc in the first st, sc in the next 4 its, 2 sc in the last . Ch 1 turn. (8)
Row 9: slst the next 2 sts, ch 1, 2sc in the next st, sc in the next 2 sts, 2 sc in the next , skip the last 2 sts. ch 1 turn. (6)
Row 10: 2 sc in the fist st, sc in the next 4 sts, 2 sc in the last st. Ch 1 turn. (8)
Row 11: Sc in each st across. Ch 1 turn. (8)
Row 12: 2 sc in the first st, sc in the next 6 sts, 2 sc in the last st. Ch 1 turn. (10
Row 13: slst in the next 3 sts, Ch 1 sc in the next 4 sts, Skip the last 3 sts. Ch 1 turn (4)
Row 14: Sc in each st. (4)
(Fasten off and weave in your ends. )
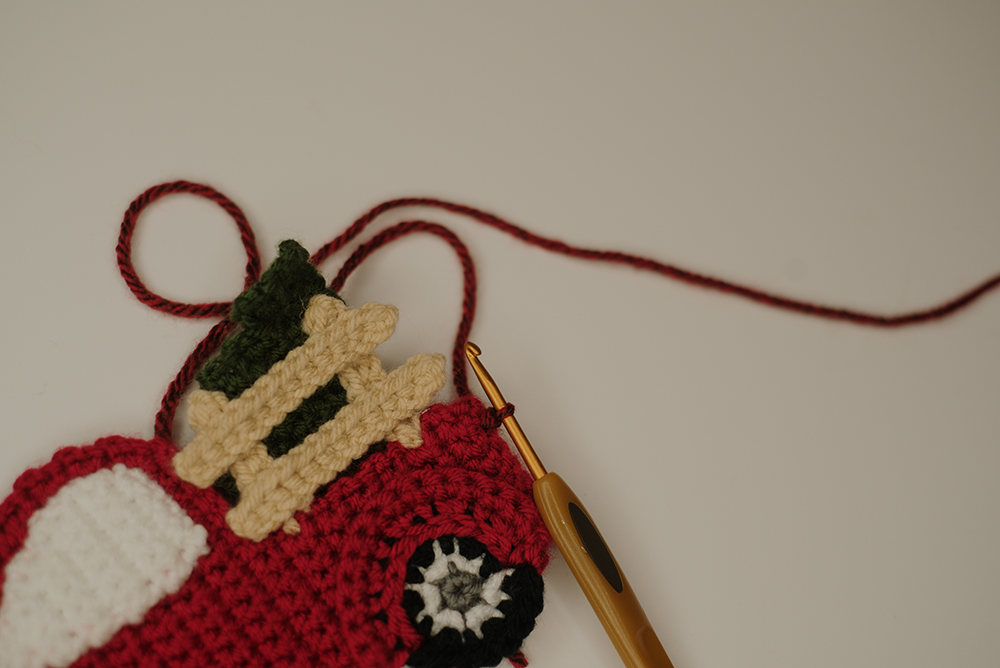
Assemble
For this step you can either use a glue gun (which I prefer) or sew each piece on. I will add pictures below of placement.

Attach your tires and fender pieces.
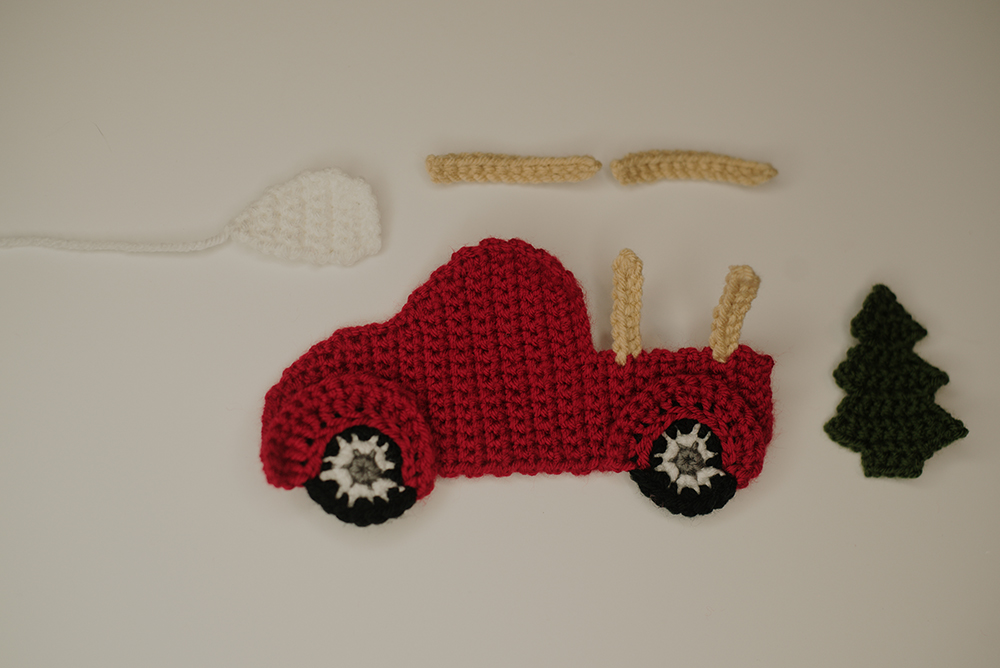
Now attach your window.
Attach your wood frame piece to the wood frame thats on the truck.
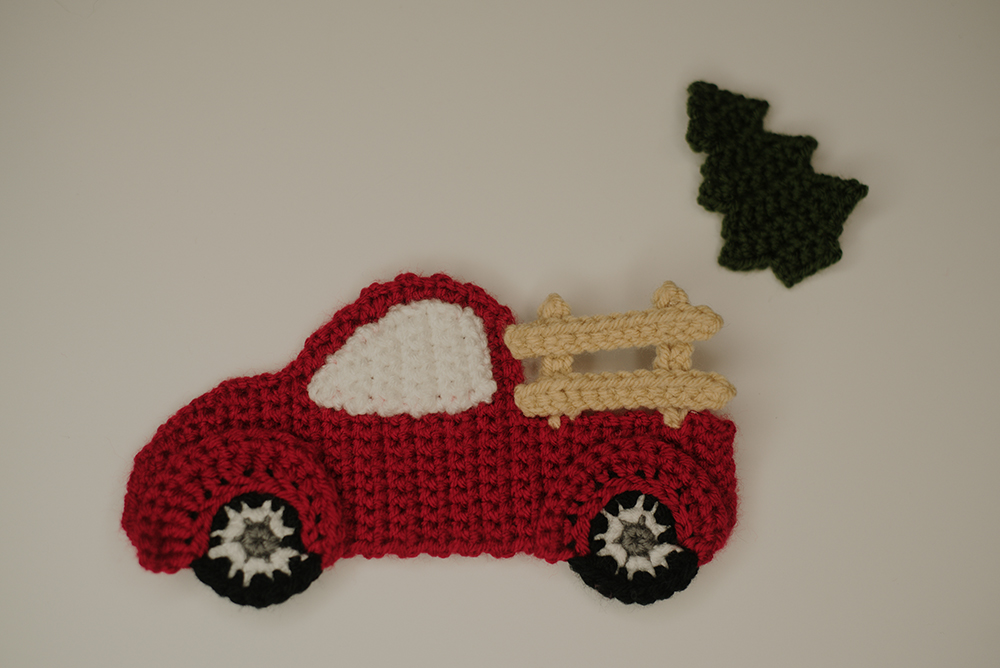
Add your Christmas tree to the truck bed.

Copyright © 2019 Oh Another Craftyish Blog by Tawnya Myers, all rights reserved.
Hey there! Just a heads up, I own all the copyrights to this pattern and the photos. Feel free to sell whatever you make with it! If you do sell it, I’d really appreciate it if you drop a link back to my post. Just remember, this is totally my work—I’ve put a ton of effort into creating these patterns. Happy Crocheting!