Unleash your creativity this holiday season to create your own Christmas truck ornament! With a detailed step-by-step guide, you’ll dive into the joyful world of crochet and create something truly unique.
Pin it and save for latter

Christmas is right around the corner. It is just 13 days away, which feels both exhilarating and slightly overwhelming as the countdown begins. The excitement in the air is palpable, as everyone prepares for this magical time of year.
Streets are adorned with twinkling lights. Storefronts show festive decorations. The aroma of freshly baked cookies wafts through the neighborhoods. I have carefully scaled my truck applique pattern down, ensuring that every detail remains intact.
Now, it can become a delightful Christmas truck ornament. It glimmers on the tree, catching the attention of everyone who walks by. It adds a personal touch to my holiday decor. This makes it truly unique and filled with love. It is a beautiful reflection of the joy and creativity of the season. The charm of red trucks is undeniable. Especially during this festive season, they never fail to bring a smile to my face. They are a nostalgic reminder of past celebrations and happy memories.
Thoughts of family gatherings around the fireplace come to mind. The sound of Christmas music plays softly in the background. They remind us of joyful road trips, filled with laughter and stories shared along the way. Cozy gatherings with family and friends evoke memories. Laughter and warmth filled the air. Everyone felt at home. I believe these lovely ornaments will serve as decorations. They will also be cherished keepsakes.
They capture the essence of the season in vibrant colors and patterns. They embody the warm spirit of Christmas. They remind us of moments shared and the connections we hold dear. Laughter echoes through the rooms of our hearts. They symbolize love, togetherness, and the joy of giving. They inspire us to spread kindness and cheer to everyone around us. We should make an effort to reach out to neighbors, friends, and even strangers. We can share not only gifts but the gift of companionship and joy during this special time of year.
I am all about collecting special ornaments for each year to remember those special moments. The Christmas truck ornament is sentimental to me for many reasons. One being my dad’s love for it, I talked about this in another post. I even crocheted him a truck pillow set. The Christmas truck ornament just gives me a lot of memories of him. Two, I love it because it brings me joy each Christmas when I hang it on the tree. It reminds me of the warmth of family gatherings and the laughter we shared. Three I crocheted it, so it shows my passion all in one. Every time I look at it, I am transported back to those magical moments. It is not just an ornament but a symbol of love and connection. This symbol continues to grow with every passing year.
I would really appreciate your support if you enjoy all my free crochet patterns. Your help allows me to continue providing them. By following my platforms, you’ll stay updated on the latest patterns. You will also join a community of fellow crochet enthusiasts who share your passion. Your engagement means the world to me. It motivates me to keep creating and sharing new designs for everyone to enjoy. Thank you for your encouragement and support!
Create your own Christmas truck ornament below with step-by-step instructions.
Supplies
- Hobby lobby I love this yarn. It is Weight 4/medium and 355 yards, 7 ounces. The available colors are Fire Red, White, Black, Graphite, Toasted Almond, Forrest Green, and Cranberry.
- 3.25mm (D) Hook (or hook to obtain the gauge)
- Tapestry Needle
- Hot glue gun
Abbreviations:
Ch(s) = Chain(s)
St(s) = Stitch(es)
Hdc = Half Double Crochet
Dc = Double Crochet
Slst = Slip Stitch
Dec = Decrease
Sc =Single Crochet
Mc = Magic Circle
Notes:
Rounds are worked in continuous rounds unless stated otherwise.
Pattern:
Truck Body
(Make two)
(Start in color fire red)
Row:1 Ch 7 In the 2nd ch from hook sc, sc the next 6 sts. Ch 1 turn. (7)
Row 2-10: Sc in each st across. Ch 1 turn. (6)
Row 11: Sc in each st across. Ch 5 Turn. (6 sts, 5 chs)
Row 12: 2 Sc in 2nd ch from hook, sc the next 9 sts. Ch 1 turn. (11)
Row 13: Sc in the next 10 sts. 2 sc in the last st. Ch 1 turn. (12)
Row 14: 2 Sc into the first st, sc into the next 11 sts. Ch 1 turn. (13)
Row 15-19: Sc in each st across. Ch 1 turn. (13)
Row 20: Dec, sc in the next 11 sts. Ch 1 turn. (12)
Row 21: Sc in the next 10 sts, dec. ch 1 turn. (11)
Row 22: Dec, sc in the next 9 sts. Ch 1 turn. (10)
Row 23: Sc in the next 8 sts, dec. Ch 1 turn. (9)
Row 24: Dec, sc in the next 7 sts. Ch 1 turn. (8)
Row 25: Sc in the next 6 sts, dec. Ch 1 turn. (7)
Row 26-28: Sc in each st across. Ch 1 turn. (7)
Row 29: Sc in the next 5 sts, dec. Ch 1 turn. (6)
Row 30: Sc each st across. (6)
(Fasten off and weave in the tail. Repeat this on the second body.)

Front tire/fender
Tire 1
(Tire 1 is for the front side of the Truck.
(You will be switching colors from Graphite, white, black, and fire red.)
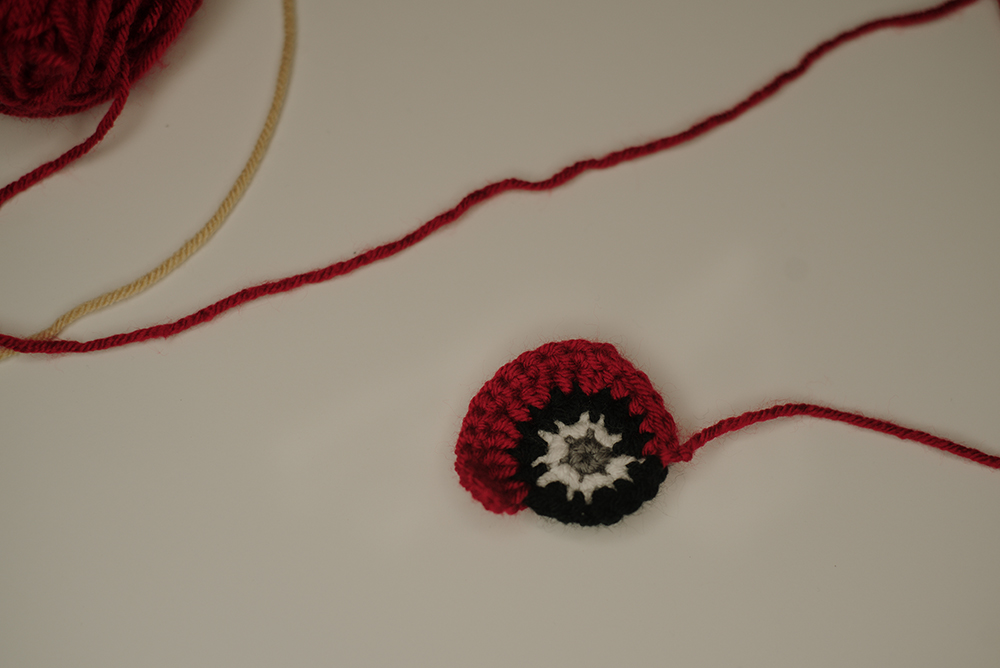
Round 1: In color graphite Mc 6 sc. (6)
Round 2: Switch to color white. * sc, 2sc, Repeat from * around. (9)
Round 3: Switch to color black. 2 sc in each st around. (18)
Row 4: Switch to color fire red. Sc, 2 sc, sc, hdc in the next 2 sts, 2 hdc, dc in the next 2 sts, 2dc, dc in the last 2 sts. Ch 1 turn. (14)
Row 5: Dec, sc , 2 sc, sc in the next 2 sts, 2 sc, sc in the next 3 sts, slst the remaining 4 sts. (13)
(Fasten off and weave in the tail.)
Tire 2
(Tire 2 is for the back side of the truck.)
(You will be switching colors from Graphite, white, black, and fire red.)
Round 1: In color graphite Mc 6 sc. (6)
Round 2: Switch to color white. * sc, 2sc, Repeat from * around. (9)
Round 3: Switch to color black. 2 sc in each st around. (18)
Row 4: Dc the first 2 sts, 2 dc, dc in the next 2 sts, 2 hdc, hdc, in the next 2 sts, sc, 2sc, sc. Ch 1 turn. (14)
Row 5: Slst in the first 4 sts, sc in the next 3 sts, 2 sc, sc in the next 2 sts, 2sc, sc, dec. Ch 1 turn. (13)
(Fasten off and weave in the tail.)
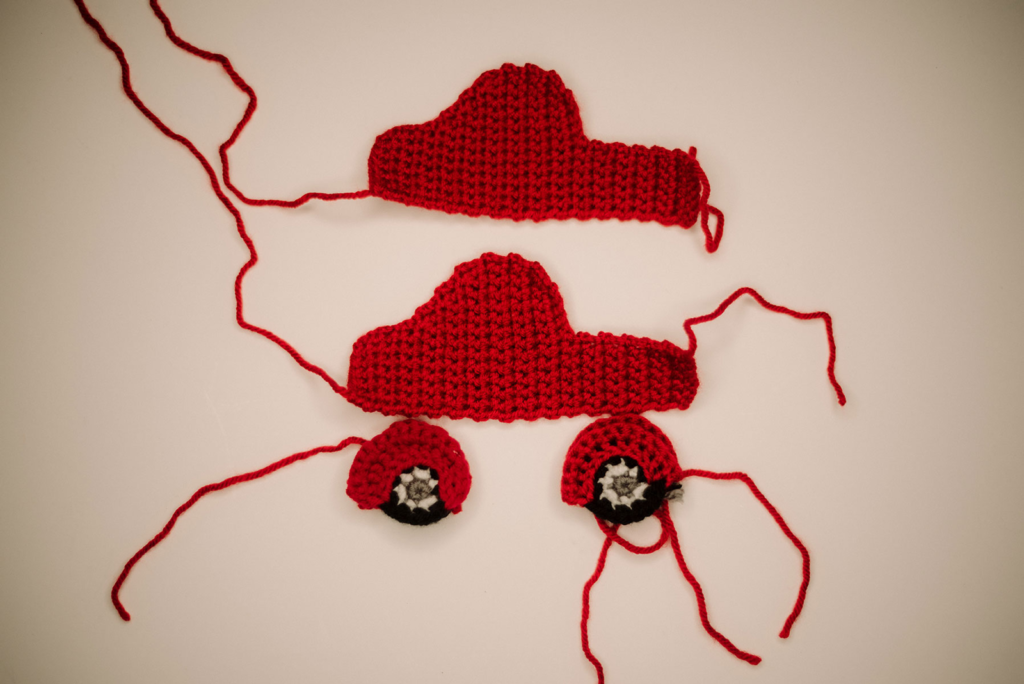
Back tire/fender
(Make two)
(You will be switching colors from Graphite, white, black, and fire red.)
Round 1: In color graphite Mc 6 sc. (6)
Round 2: Switch to color white. * sc, 2sc, Repeat from * around. (9)
Round 3: Switch to color black. 2 sc in each st around. (18)
Row 4: Switch to color fire red. Sc in the next 11 sts. Ch 1 turn. (11)
Row 5: Sc in the first 4 sts, 2 sc, 2sc, sc in the next 4 sts. Ch 1 turn. (13)
(Fasten off and weave in the tails of each back tire and fender.)
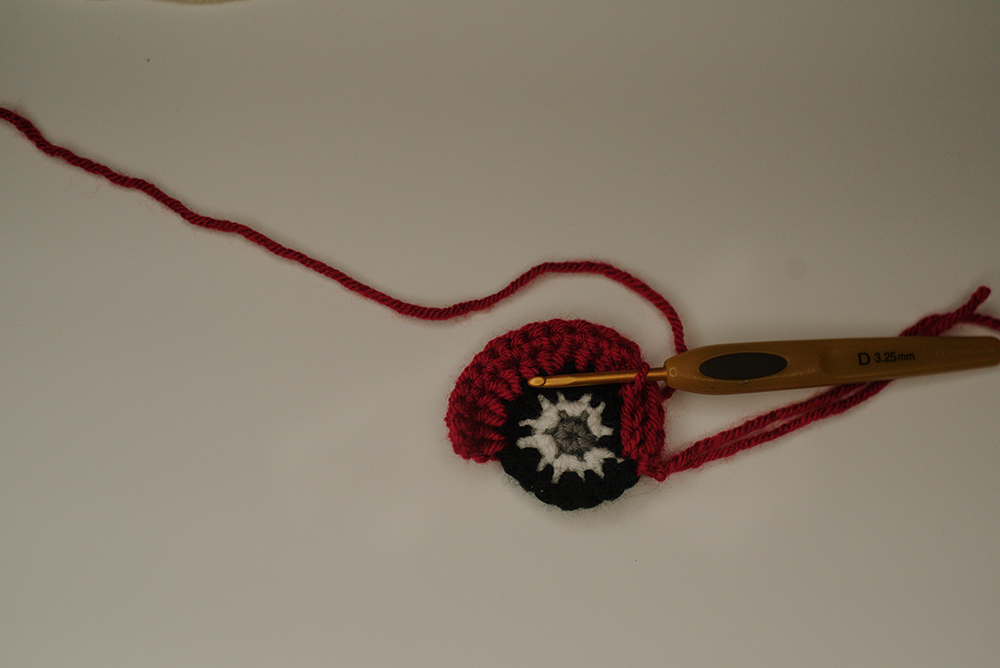
Tire Details
(We are going to surface Crochet on all 4 tires. This adds the details to the fender.)
Attach your yarn between round 3-4 where we started the fender. slst in each st around for a total of 11. (11)
Window
(Make two)
Row 1: In Color white ch 4, In the 2nd ch sc, sc in each ch across. Ch 1 turn. (3)
Row 2: Sc in the next 2 sts, 2 sc in the last. Ch 1 turn. (4)
Row 3-5: Sc in each st across. Ch 1 turn. (4)
Row 6: Sc in the first 2 sts, dec. Ch 1 turn. (3)
Row 7: Dec, sc. Ch 1 turn. (5)
Row 8: Dec. Ch 1 turn. (4)
(Fasten off and leave a long tail for sewing on to the truck.)
(Sew on to the truck cab part on both Truck body pieces)

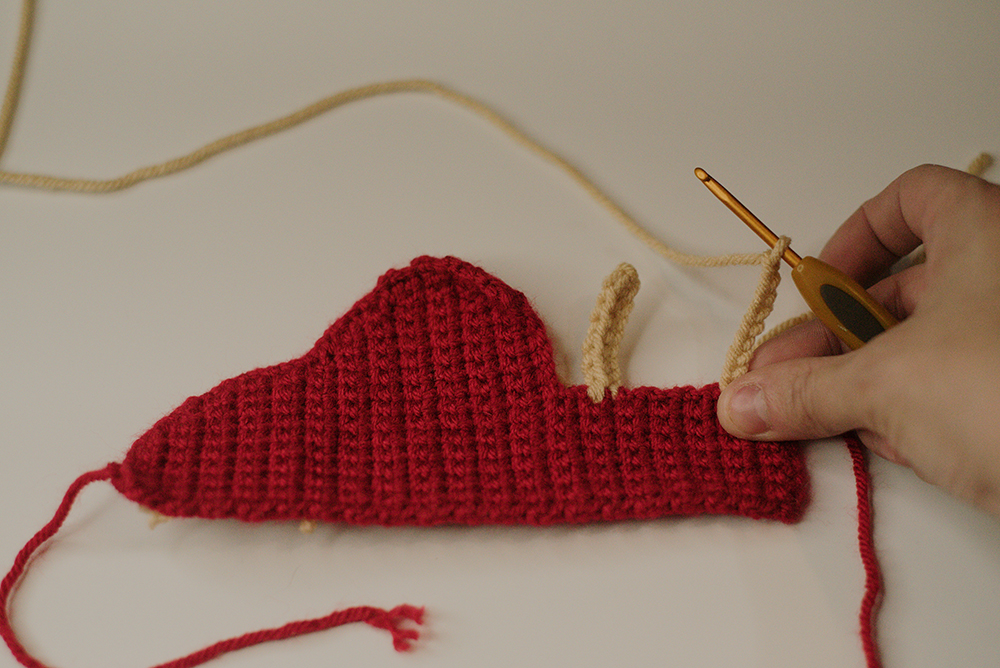
Wood Frame
Set 1:
Attach color toasted almond yarn to the truck between row 2-3. Ch 8.
Row 1: slst in 2nd ch from hook. slst in the next 6 sts. Slst where you joined your yarn and fasten off and weave in ends (8)
Set 2:
Attach color toasted almond yarn to the truck between row7-8 Ch 8.
Row 1: slst in 2nd ch from hook. slst in the next 6 sts. Slst where you joined your yarn and fasten off and weave in ends (8)
(Repeat Both steps 1 and 2 on both Truck bodies.)
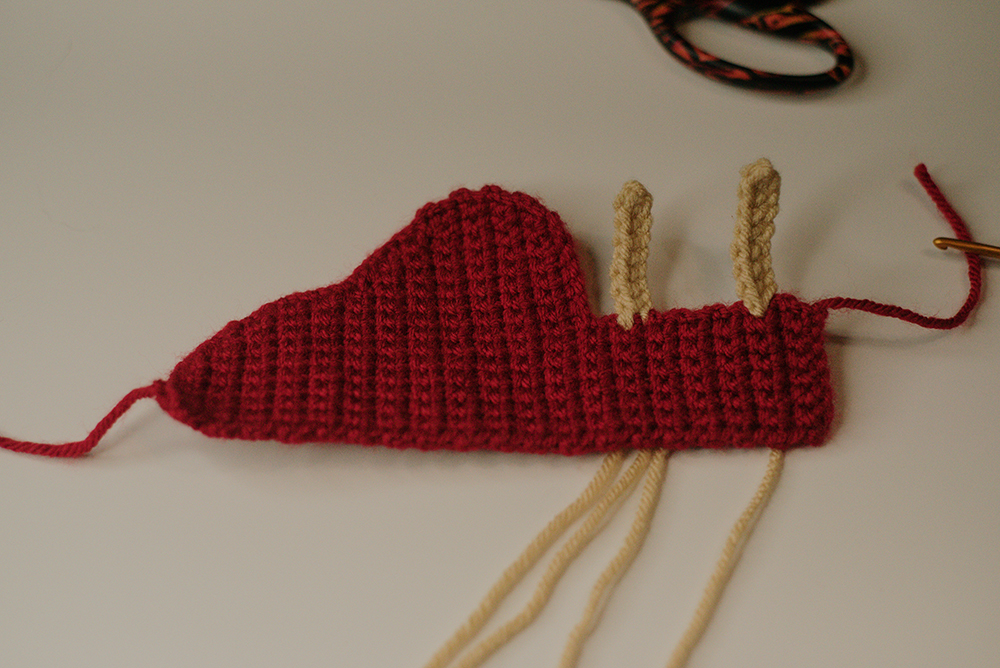
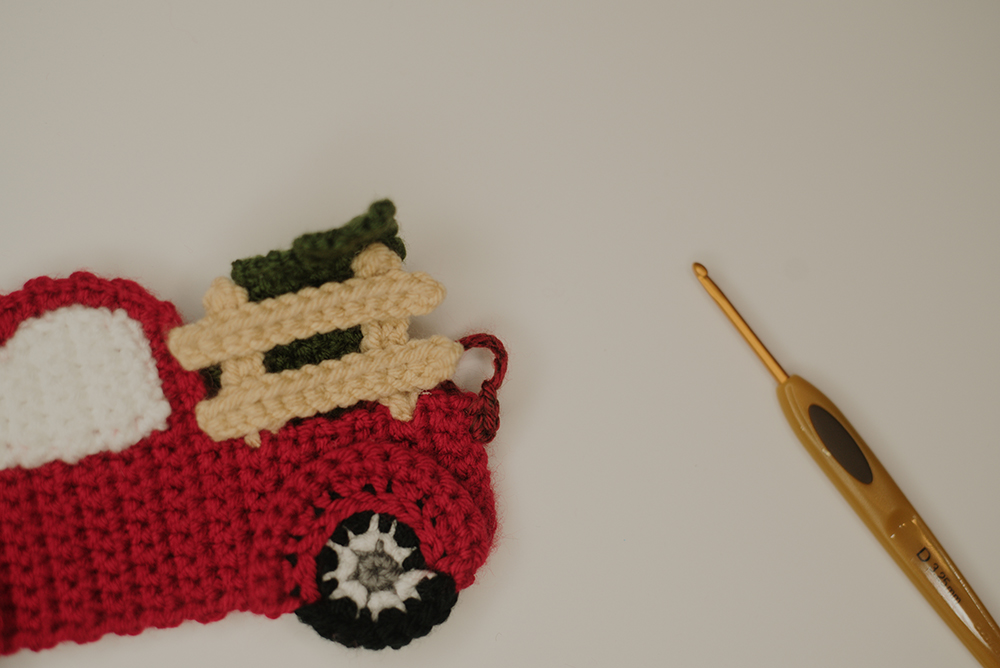
Set 3:
(Make Four)
Row 1: In color toasted almond ch 13. slst in 2nd ch from hook. slst in the next 11sts. Fasten off and weave in ends (12)
This image is showing for one side of the truck. Each side will look the same. So, make sure you make four of set 3. Using 2 for each truck side.
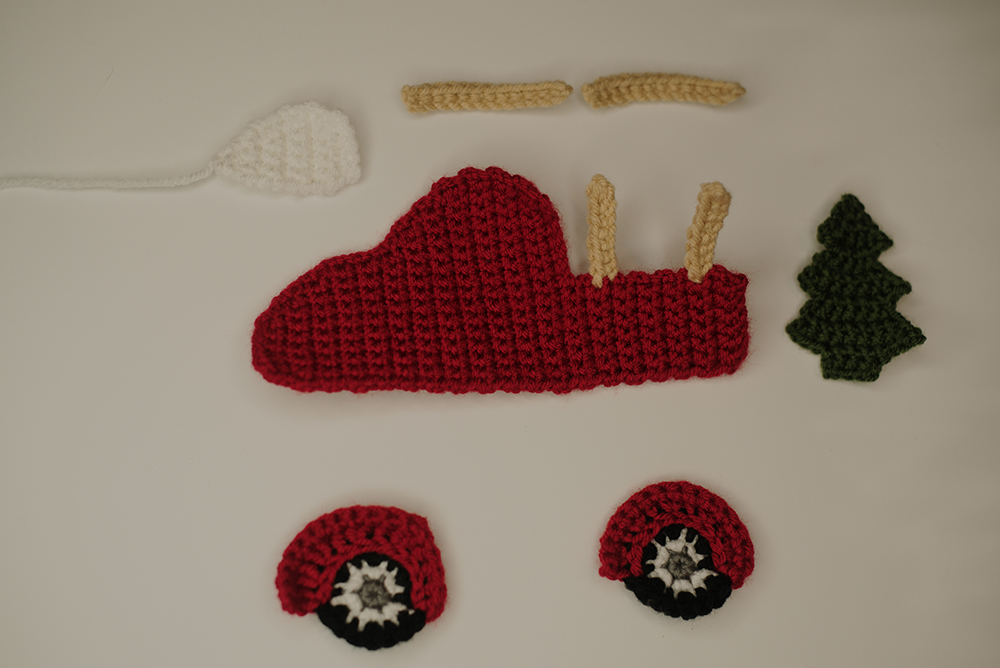
Christmas Tree
Row 1: In Color Forrest green ch 2, 2 sc in the 2nd ch from hook. Ch 1 turn. (2)
Row 2: 2 sc in each st across. Ch 1 turn. (4)
Row 3: Sc in each st across. Ch 1 turn. (4)
Row 4: 2 sc in the first st, sc the next 2 sts, 2 sc in the last st. Ch 1 turn. (6)
Row 5: slst the next 2 sts, ch 1, 2sc in the next 2 sts, skip the last 2 its. ch 1 turn. (4)
Row 6: 2 sc in the first st, sc in the next 2 its, 2 sc in the last. Ch 1 turn. (6)
Row 7: sc each st in each st across. Ch 1 turn. (6)
Row 8: 2 sc in the first st, sc in the next 4 its, 2 sc in the last. Ch 1 turn. (8)
Row 9: slst the next 2 sts, ch 1, 2sc in the next st, sc in the next 2 sts, 2 sc in the next, skip the last 2 sts. ch 1 turn. (6)
Row 10: 2 sc in the first st, sc in the next 4 sts, 2 sc in the last st. Ch 1 turn. (8)
Row 11: Sc in each st across. Ch 1 turn. (8)
Row 12: 2 sc in the first st, sc in the next 6 sts, 2 sc in the last st. Ch 1 turn. (10
Row 13: slst in the next 3 sts, Ch 1 sc in the next 4 sts, Skip the last 3 sts. Ch 1 turn (4)
Row 14: Sc in each st. (4)
(Fasten off and weave in your ends.)
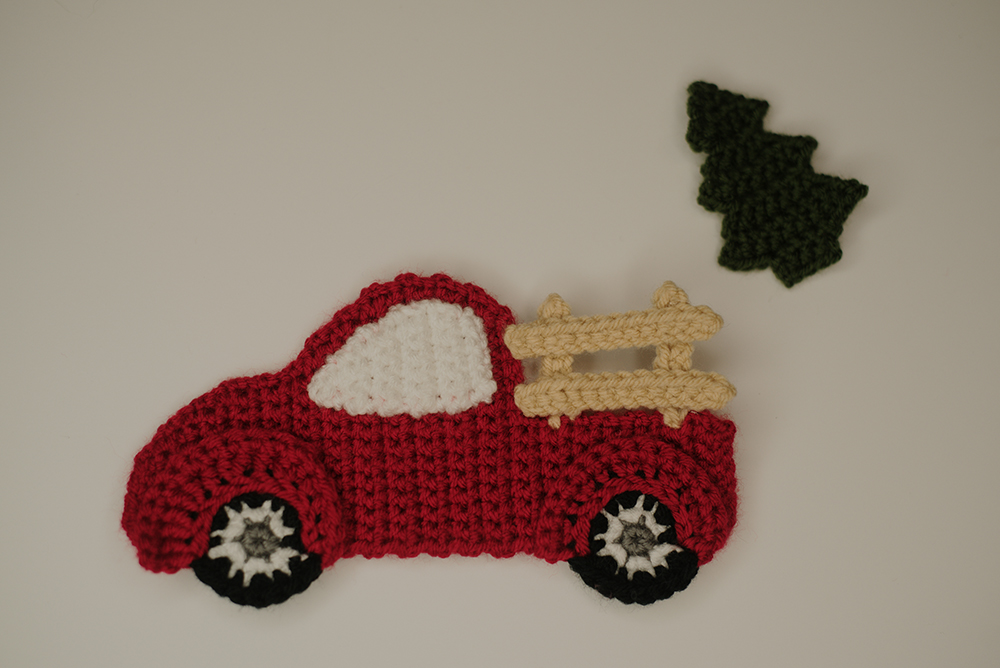
Assemble
Door handle
In color graphite sew over 3 sts about 2 rows below the window placement.
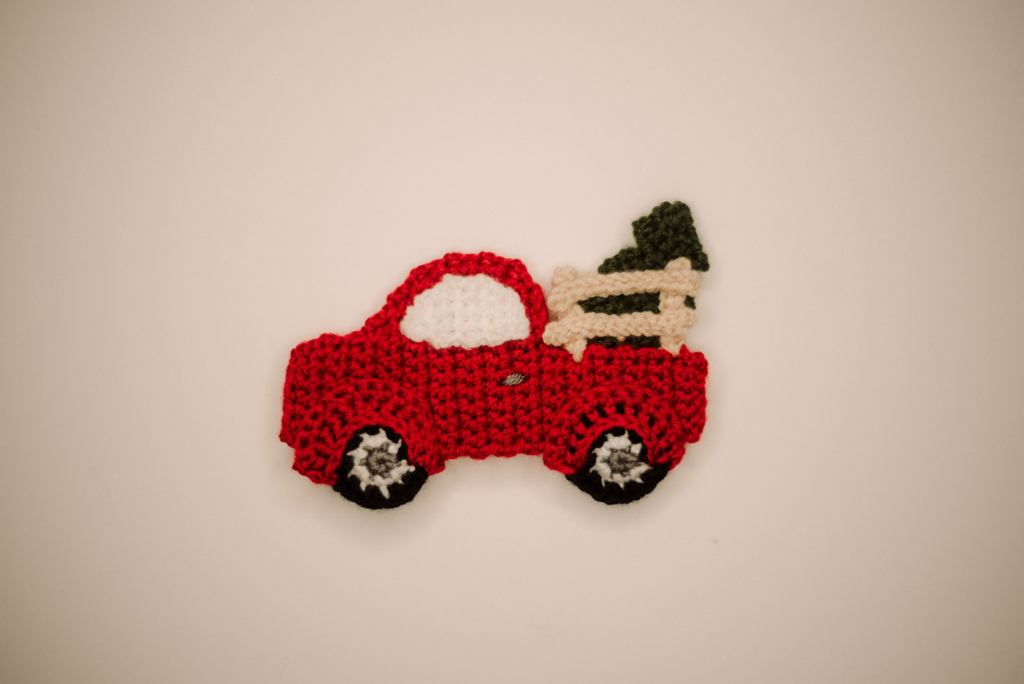
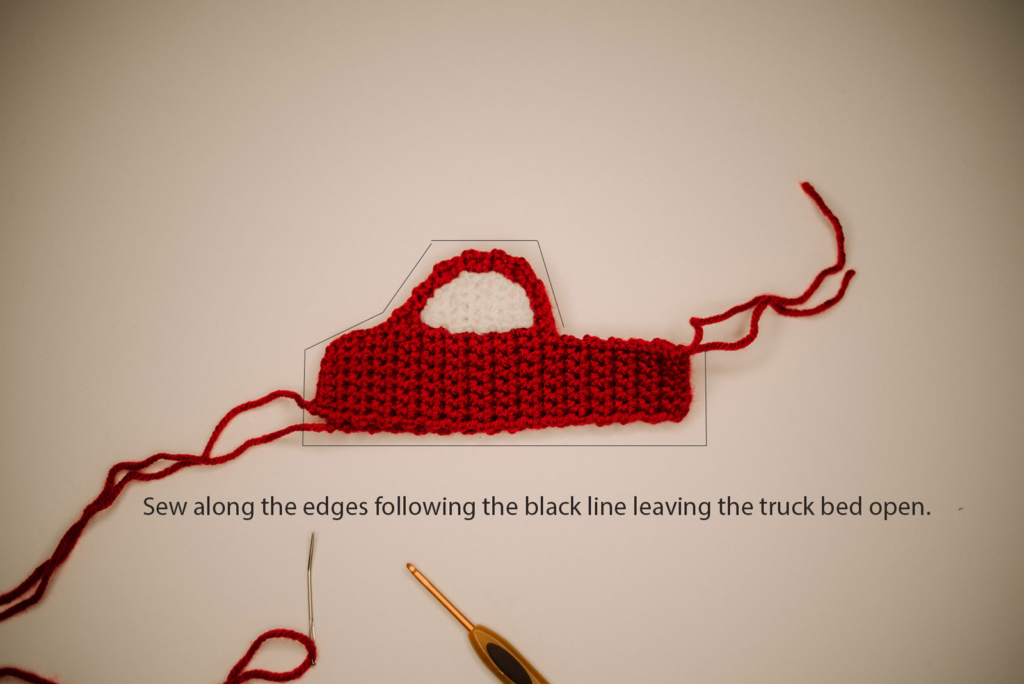
Sew on the Truck Windows. you should have added part 1 and 2 of your wood frame to your truck body. Now align both truck bodies together. Then sew along the edges leaving the truck bed open. Picture below.
Now add your Christmas tree in to the bed of the truck at a slight angle.

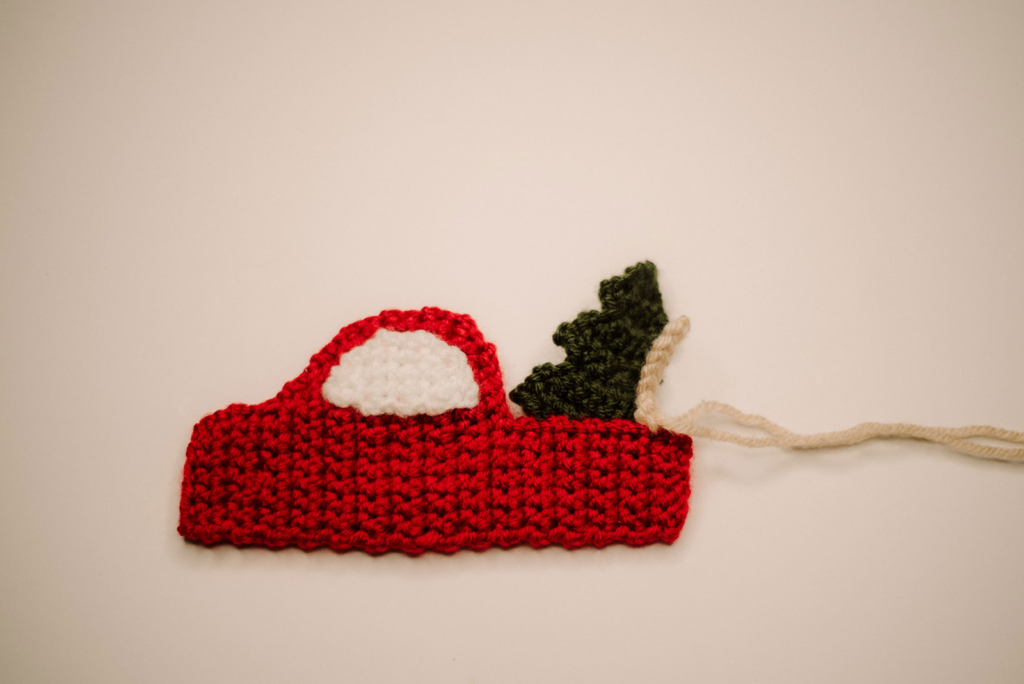
Once you have added the tree in sew the wood frame together.
Add set 3 of the wood frame over top of the wood frame that’s on the truck. have it laying long wise and sew together. one at the bottom and one at the top on both sides.
Bumper
Front Bumper
Using color graphite attach your yarn to the 2nd to the last st from the bottom. Sc in the same space as you attached your yarn. Sc in the last st and fasten off and weave in your tail.
Back Bumper
Using color graphite attach your yarn to the bottom of the truck bed. Add 2 sc in the same st you attached your yarn. 2 sc in the next st and fasten off and weave in your tail.
Lights
Tail light
Using color Cranberry attach your yarn to the 2nd to the last st from the top of the truck bed. Sc in the same st you attached your yarn. Sc in the next st and fasten off and weave in your tail.
Headlight
Using color white attach your yarn to the first st. slst in the same st you attached your yarn. Sc in the next st and fasten off and weave in your tail.
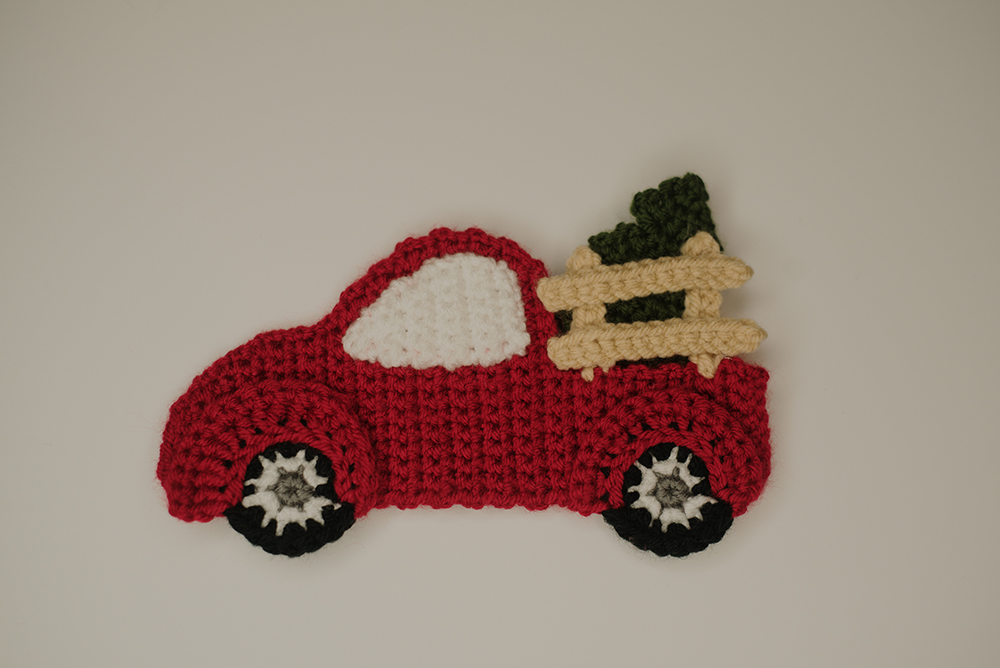
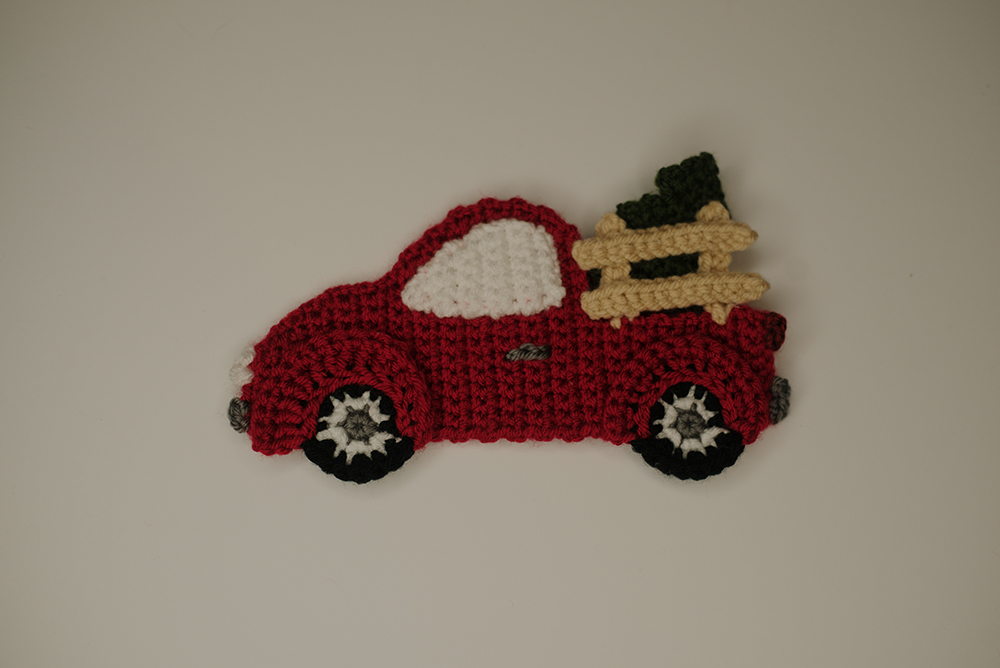
Now hot glue your back tires on one on each side. First, hot glue the front tires on. Make sure tire one is on the front, and tire two is on the back. You have now completed your truck.
I really hope you enjoy this Christmas truck ornament, as it brings you so much joy for the special holiday. Each detail has been thoughtfully designed to evoke the warmth and cheer of the season. It creates a festive atmosphere in your home. Whether used in crafting, decorating, or gifting, this pattern is sure to add a touch of nostalgia and delight. It inspires cherished memories with loved ones and enhance your celebrations with its charming representation of holiday spirit.
I truly hope you’ve loved this pattern! If you create your own Christmas truck ornament I’d be thrilled if you shared it on my Facebook and Instagram. Don’t forget to like and follow to stay in the loop for exciting new patterns! And remember to use the hashtag #crochetchristmastruckornament when you share your lovely creations!
Copyright © 2019 Oh Another Craftyish Blog by Tawnya Myers, All rights reserved
Hey there! Just a heads up, I own all the copyrights to this pattern and the photos. Feel free to sell whatever you make with it! If you do sell it, I’d really appreciate it if you drop a link back to my post. Just remember, this is totally my work—I’ve put a ton of effort into creating these patterns. Happy Crocheting!